
WELCOME TO THE BRICK TRICK ONLINE STUDIO

Here you can view our designs, projects and building instructions.

Sunday, May 13, 2012

PURPLE JUICE BAR KIT • BUILDING INSTRUCTIONS

Above: The PURPLE JUICE BAR custom building kit shown assembled with female minifigure "TAMMY".

PURPLE JUICE BAR CUSTOM KIT • BUILDING INSTRUCTIONS

This posting contains images and instructions identical to the printed directions which come with this custom building kit available from BRICK TRICK DUDE on Ebay®.

REMINDER: Enlarge the images by clicking on them.

Check out the BRICK TRICK DUDE store on Ebay®, go here: http://stores.ebay.com/bricktrickdude


Above: The PURPLE JUICE BAR shown with male minifigure "TIMMY".

Above: Part included in the PURPLE JUICE BAR custom kit.

PARTS LIST
1 orange trans. 1x1x2/3 slope
1 blue 1x2 45-degree slope
1 dark purple 1x2 brick w/hole
1 black/gray gearshift
7 lime 1x1 caps
1 black antennae pole
1 dark purple 4x4 parabola
4 aqua trans 2x2 round bricks
1 lime 1x2 plate
4 lime 1x4 plates
9 orange 1x1 caps
6 dark purple 2x3 plates
9 purple trans. 1x1 cones

Step 1: Place orange transparent slope on top of blue 1x2 slope to create cash register.  Put 1 lime 1x1 cap on to the dark purple parabola.  Place orange 1x1 caps on purple transparent 1x1 cones to build juice bottles.

Step 2: Lay out 3 dark purple plates and snap on the dark purple 1x2 brick as shown.

Step 3: Snap on 4 aqua blue transparent 2x2 round bricks.

Step 4: Add remaining 3 dark purple plates.

Step 5: Place 4 lime 1x4 plates as shown.

Step 6: Add lime 1x2 plate.

Step 7: Place 6 lime 1x1 caps on bottom of bar as shown.
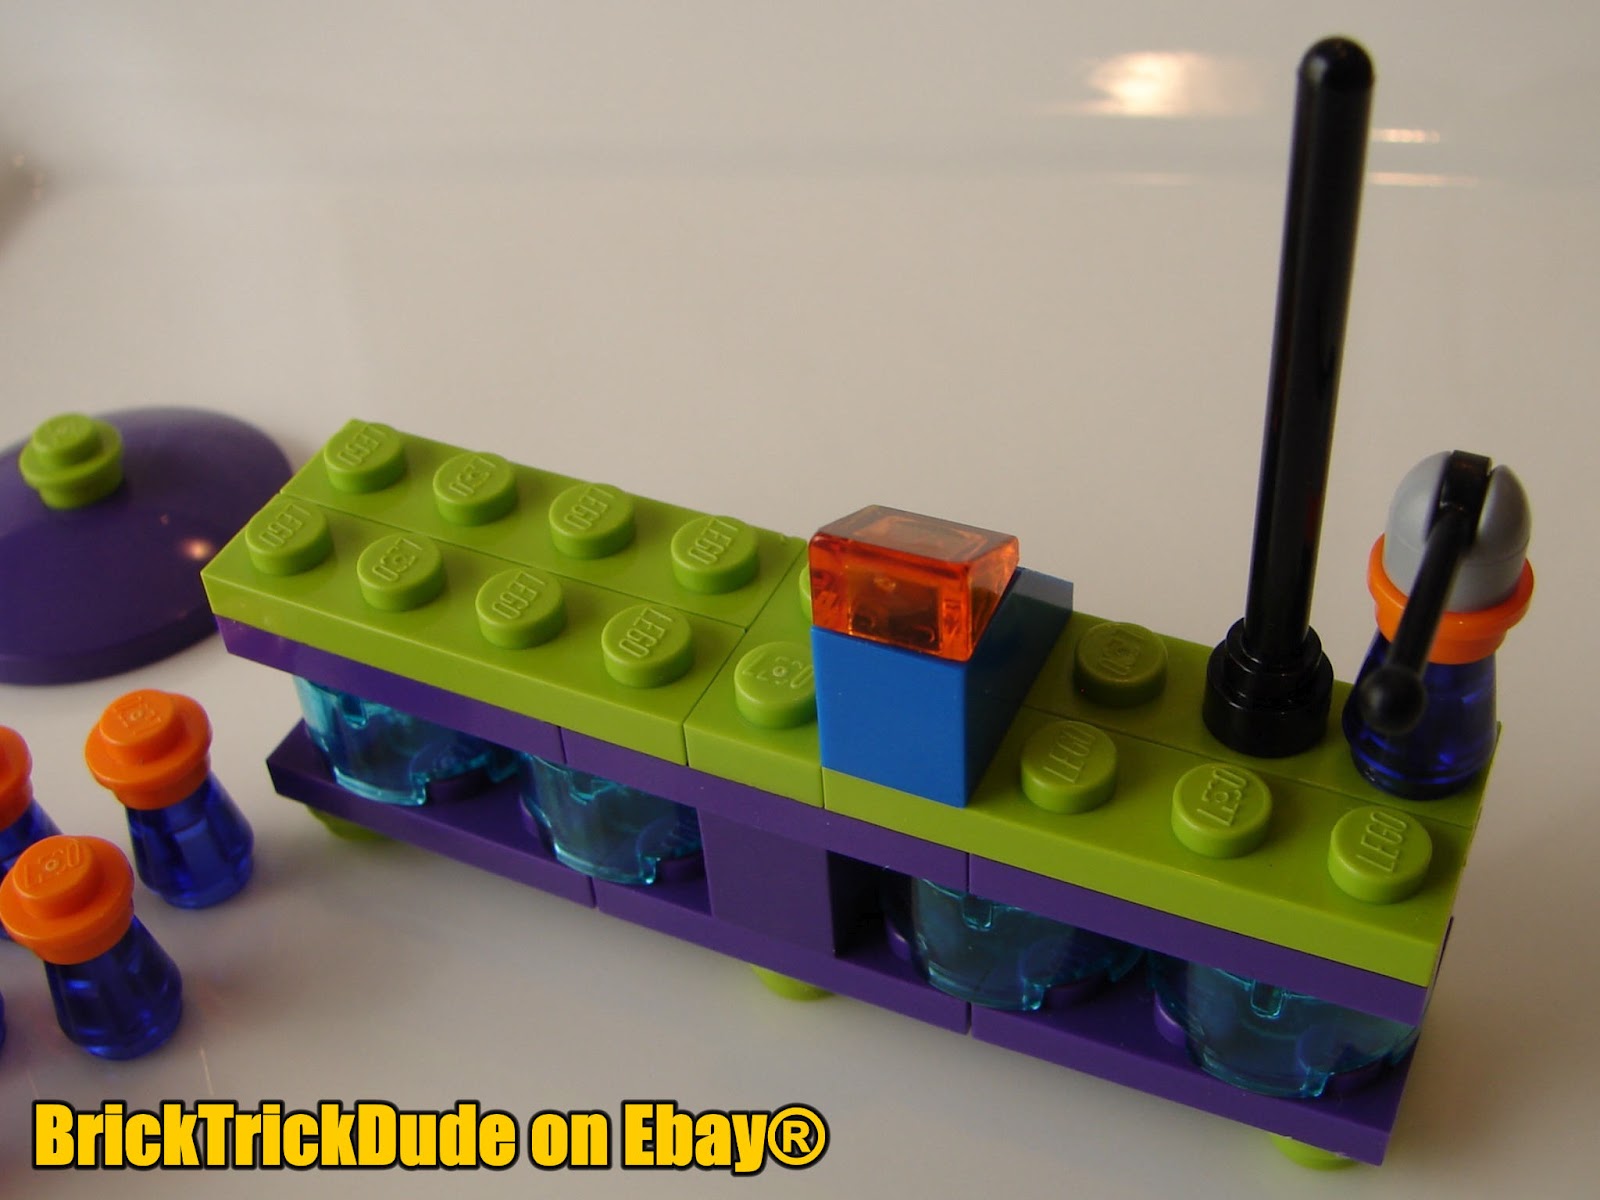
Step 8: Place the black and gray gearshift on top of one juice bottle to create sampler pump.  Add pump, cash register and black pole to bar top.

Step 9: Snap dark purple parabola on to black pole to complete the umbrella.  Stack juice bottles on bar as shown or any way you like.

Saturday, March 31, 2012

AQUA WAVE ART MUSEUM • CUSTOM MODULAR BUILDING


Above: The AQUA WAVE ART MUSEUM custom modular building designed and constructed by Brick Trick artist Trick Richey.

AQUA WAVE ART MUSEUM • CUSTOM MODULAR BUILDING

This posting features images for another BrickTrickDude custom building. The stylish and modern AQUA WAVE ART MUSEUM is an original creation from the Brick Trick building studio here in San Francisco and is one-of-a-kind. This architectural sculpture was previously sold on Ebay.

EXTERIOR: The AQUA WAVE ART MUSEUM project features 3 stories of space constructed on a 16x32 peg base plate. The front exterior is decorated on the sidewalk level with a sleek “glass” sculpture on a pristine white pedestal. The building itself is a modern and highly stylish curved creation of “aqua glass” bricks. The second floor exterior has a curved aqua glass window, while the third floor exterior has a balcony and the curved aqua glass repeats. The entire front facade is a modern color scheme of aqua blue “glass” as well as white and light gray accents. The back and sides of the building are white with accent stripes of light gray. The back features aqua glass windows on all three floors, and on the ground level there is a quaint “sculpture garden” with flowering plants and seating. Modular construction techniques allow the roof and top floors to be removed for interior viewing and then easily re-stacked.

INTERIOR: The sculpture gallery occupies the interior of the ground floor. The space has high ceilings, a large “crystal” sculpture in the front curved window and several other “glass” creations displayed on pedestals. Plus an elevator that takes you to the other floors. The entire ground floor is tiled in pristine white. The second floor is the painting gallery, with various colorful “paintings” displayed on the walls. The top floor is the “LOOKOUT LOUNGE”, with a cool aqua blue beverage bar and stools, along with more art and many accessories including pearl gold goblets. Plus, don’t miss the great view from the third floor balcony!

DETAILS: Project contains approximately 1,200 bricks and parts and includes three minifigures as shown, (2 females, one male). The front sidewalk is constructed of white smooth tiles, (and some accent colors), and does not match other building sidewalks of larger-scale architectural projects from the manufacturer, however the light bluish gray curb does match. There are no technic bricks with holes on the sides for joining to other structures. Finished model weighs approximately 3 pounds. Model measures 5 inches wide and 10 inches deep at the base plate. Building stands approximately 11 1/4 inches tall at the highest point of the roof top skylight.


Above: The back of the AQUA WAVE ART GALLERY, which has a "sculpture garden" with art, plants and a bench.


Above: The interior of the top floor which serves as the LOOKOUT LOUNGE, has a bar, stools and more art.


Above: The second level is another art gallery with "paintings" displayed on the walls.


Above: The four modular components which stack to create the AQUA WAVE ART GALLERY.

Tuesday, January 17, 2012

2012 FLOWER GARDEN and BENCH KIT • BUILDING INSTRUCTIONS


Above: The new 2012 FLOWER GARDEN and BENCH kit shown assembled with gal pal Sophia.

2012 FLOWER GARDEN and BENCH KIT • BUILDING INSTRUCTIONS

This posting contains images and written directions identical to the printed instructions which come with this custom building kit available exclusively from BrickTrickDude on Ebay®.

REMINDER: Enlarge the images by clicking on them.

Below: Parts included in this custom kit.


PARTS LIST
1 dark green 6x10 plate
7 green bamboo leaf parts
1 reddish-brown 2x6 plate
2 reddish-brown 1x2 palisade bricks
4 tan 1x1 bricks
2 red transparent 1x1 tiles
1 tan 1x6 brick
1 dark purple 1x1 cap
1 orange 1x1 cap
2 lime 1x1 caps
3 dark tan 2x2 tiles
1 black 1x4 lattice fence
1 white 2x2 flower
2 yellow 2x2 flowers
1 blue 2x2 flower
2 sprues of 4 dark pink flowers
2 sprues of 4 red flowers
4 green stalks with 3 stems

GAL PAL Minifigure “Sophia” is assembled.
1 dark brown “ponytail with side bangs” wig
1 female head w/eyebrows, red lipstick/alternate face
1 white/blue printed torso
1 blue hips/legs


Step 1: Add tan 1x6 brick to dark green 6x10 plate as shown. Form bench by adding 2x6 plate to 1x2 palisade bricks. Create 2 stacks of 2 tan 1x1 bricks and top with red transparent 1x1 tiles. Place 1x1 caps on 2x2 flowers as shown. Build a stack of 2 and 3 bamboo leaf parts. Add 2x2 flowers with caps to leaf parts. Remove small flowers from sprues and place on green stalks with 3 stems. Stack 2 stems together to form 2 bouquets of small flowers.


Step 2: Add tan posts and black lattice fence to tan 1x6 brick. Place dark tan 2x2 tiles on dark green 6x10 plate at front. Add bench as shown.


Step 3: Add bouquets to front corners of 6x10 plate. Add 2x2 flowers/leaf parts to layout as shown or any way that suits your gardening taste.

Saturday, December 10, 2011

"BLING" DRUM GIRL & STAGE KIT • BUILDING INSTRUCTIONS


Above: The "BLING" DRUM GIRL and STAGE kit shown assembled.

"BLING" DRUM GIRL and STAGE KIT • BUILDING INSTRUCTIONS

This posting features images and instructions identical to the printed directions which are included with this custom building kit designed by BRICK TRICK and available only from BrickTrickDude on Ebay.

REMINDER: Enlarge the images by clicking on them.

Below: Parts included in the BrickTrickDude custom kit.


PARTS LIST
2 dark aqua 2x8 plates
1 white 2x2 brick
2 reddish-brown light sabers
1 white antennae pole
2 dark pink trans. 2x2 parabolas
2 pearl gold 2x2 round tiles
2 med. blue trans. 1x2x5 bricks
2 magenta 1x2 bricks
2 white 1x4 bricks
2 white 1x6 bricks
4 white 1x1 tiles with clip
4 white 1x2 plates w/bar
1 white 1x8 tile
2 white 1x2 cylinders
1 white 1x1 brick
1 white 1x1 brick with side peg
1 dark blue trans. 1x1 cap
1 yellow trans. 1x1 cap
1 med. blue trans. 1x1 cap
1 red trans. 1x1 cap
2 neon orange trans. flames

GAL PAL Minifigure “Sheila” is assembled.
1 black long wig
1 female head w/red lipstick
1 white printed torso with dollar-sign bling pendant
1 blue hips/legs


Step 1: Place med. blue trans. 1x2x5 bricks on top of magenta 1x2 bricks. Place transparent caps in white 1x1 tiles with clip to create spotlights. Stack white 1x1 brick on top of white 1x1 brick with peg on one side. Slip dark pink trans. parabolas on white antennae, with the bottom parabola upside down. This creates the drum set symbols. Put flames in white cylinders for pyrotechnics.


Step 2: Snap both white 1x4 and 1x6 bricks on to the underside perimeter of the dark aqua 2x8 plates to build the stage platform.


Step 3: Add 2x2 brick for stool.


Step 4: Add round tiles to drum base.


Step 5: Build the backdrop by snapping the spotlights built in Step 2 on to the white 1x2 plates with bars. Add to the underside of the white 1x8 tile. Stack light assembly on top of medium blue trans. 1x2x5 and magenta 1x2 bricks.


Step 6: Carefully attach the backdrop on stage over the drummer seat. Add flaming pyrotechnics at corners. Place drum set and symbols as shown. Add brown sabers to minifig hands to serve as drumsticks. Now you’re ready to rock!

Tuesday, November 22, 2011

HOLIDAY TRAIN and TOWN LAYOUT


Above: The HOLIDAY TRAIN and TOWN LAYOUT built by BrickTrick artists on the hearth of an unused fireplace.

HOLIDAY TRAIN and TOWN LAYOUT

Last year we wanted to have a train set-up in our personal residence for the holiday season. Of course we don't really have any space for a train layout installation anywhere in our house. Well, until we got a little more creative, that is. We are fortunate to have a nice granite fireplace, though since we don't need it for heat and burning wood is bad for the environment, the fireplace sits empty and unused all year long.

After some careful measuring we determined that a full circle train layout would just fit on the hearth and inside the fireplace itself. We liked the idea of the train "disappearing" into a tunnel and then coming back out again. It took some careful figuring to get the tracks to stay in place, but once the track was installed we were off creating a variety of buildings and other items, which wound up including custom-built train cars. More pictures documenting this project follow in this posting.

What are we building for 2011? A train layout with two tracks, one of which is a "subway".

Enjoy!

REMINDER: Enlarge the images by clicking on them.


Above: This shot gives an overview of the project with the train tracks installed and several base plates arranged to accommodate structures.


Above: This image shows the entire fireplace which is in the corner at the end of a great room space.


Above: An area within the tracks is to serve as a public plaza for the HOLIDAY TOWN and has an ice skating area. The technique shown here where small plates and caps surround the train tracks is called "ballasting" and is intended to have the look of a gravel bed supporting the tracks.


Above: A large facade for one of the HOLIDAY TOWN "high rise" buildings was constructed on a table top and moved to the layout for installation.


Above: More buildings have been installed on the right side of the layout and a green train is being test-run on the tracks to be sure the train can clear the tunnel entrance and exit.


Above: Large "high rise" buildings have been installed to begin to enclose the fireplace opening.


Above: The powder blue building houses a costume shop on level one and two. The top floor is the "Sky Lounge" and patrons await the tree lighting ceremony.


Above: The holiday tree is installed, though it doesn't have its decorations and "lights" yet.


Above: Nearly all of the buildings have been put in place and some custom train cars in a holiday color scheme of red, green and white are being test-run on the train tracks.


Above: "Party Cars" are part of the HOLIDAY TRAIN and passengers can eat and drink while enjoying the view of the skaters on the ice, as well as the many holiday decorations throughout the "plaza" area while riding in the open-air train cars. One open-top train car has a tree and gifts which are going to be donated.


Above: An overview of the completed HOLIDAY TRAIN and TOWN LAYOUT project. The blue building on the left side of the layout is an apartment complex, the gray building with the clock tower behind the ice rink is the TOWN HALL.


Above: Cheerleaders wave their pom-poms from the side of the ice rink while the skaters show off their moves. Minifigure artists have just finished the "ice sculpture" ANGEL located in front of the holiday tree. Under the tree is SANTA in a big red chair.


Above: Some of the smaller buildings at the right front of the layout include colorful homes.


Above: The completed HOLIDAY TRAIN and TOWN LAYOUT with the RED PARTY TRAIN running around the track.


Above: Another vantage point shows the HOLIDAY TRAIN and TOWN LAYOUT completely finished with the RED PARTY TRAIN in motion.

Monday, November 21, 2011

LIME AIRPLANE CUSTOM KIT • BUILDING INSTRUCTIONS


Above: The LIME AIRPLANE custom kit shown assembled with female minifigure "Molly".

LIME AIRPLANE CUSTOM KIT • BUILDING INSTRUCTIONS

This posting contains images and instructions identical to the printed directions which are included with this custom building kit available exclusively from BrickTrickDude on Ebay.

REMINDER: Enlarge the images by clicking on them.

Below: Parts included in the custom building kit.


PARTS LIST
1 white 1x2 tile w/tail fin
1 black/white steering wheel
1 light gray 1x2 plate w/bar
1 clear transparent 2x2 45-degree slope
1 black propeller
1 dark gray 1x2 brick w/stud
1 yellow 2x8 plate
1 light gray 2x8 plate
1 dark gray 2x4 plate
2 lime 2x2 bricks
2 white 1x2 grills
8 lime 1x2 smooth tiles
3 lime 1x2 plates
2 light gray rims
2 black wide rubber tires
1 light gray 2x2 axle plate

Minifigure Pilot “Molly” is assembled and includes:
1 brown ponytail wig
1 female head with red lipstick and alternate face on back
1 blue/white “overall” torso
1 blue hips/legs


Step 1: Attach propeller to dark gray 1x2 brick with stud. Add 1 lime 1x2 tile to clear 2x2 slope. Add tires to rims. Place light gray 1x2 plate with bar and white tail fin on dark gray 2x4 plate as shown.


Step 2: Add 1 lime 1x2 tile to dark gray 1x2 brick. Place 2 lime 1x2 tiles on tail fin assembly. Put clear slope/lime tile on yellow 2x8 plate. Add lime tiles and white grills to yellow 2x8 plate as shown. Snap lime 2x2 bricks on to light gray 2x8 plate; add the 3 lime 1x2 plates as shown. Attach wheels to light gray axle plate.


Step 3: Attach the propeller assembly to front of light gray 2x8 plate. Add wing assembly to front 2x2 lime brick. Add steering wheel to front lime 1x2 plate. Attach tail fin assembly to the rear lime 2x2 brick.


Step 4: Attach the wheel assembly to the bottom of the light gray 2x8 plate.


Notes: Add your minifigure pilot and you’re ready to fly.