WELCOME TO THE BRICK TRICK ONLINE STUDIO

Here you can view our designs, projects and building instructions.

Saturday, May 23, 2009

ORANGE SPLIT LEVEL MID-CENTURY HOUSE


Above: BRICK TRICK artist PHILIP BUCHAN replicates a classic mid-century split level using a bold orange and black color scheme.

ORANGE SPLIT LEVEL MID-CENTURY HOUSE

This posting features images of another in the series of mid-century inspired architectural creations. BRICK TRICK artist Philip Buchan used photos of a home in a nearby suburb of SAN FRANCISCO as motivation for this project.

Below: The ORANGE SPLIT LEVEL MID-CENTURY HOUSE shown from another angle. In this shot you can see that clear 1x2 plates were used to create the window "glass".


Above: The side of the building with a walkway to the front door.

Below: The ORANGE SPLIT LEVEL MID-CENTURY HOUSE shown from another viewpoint. Note the details on garage door and the "flowers" on the ledge below the window.

Saturday, May 9, 2009

ORANGE GREENHOUSE • BUILDING INSTRUCTIONS


Above: The ORANGE GREENHOUSE kit shown assembled with male minifigure "ADAM".

ORANGE GREENHOUSE • BUILDING INSTRUCTIONS

This posting features directions to build the ORANGE GREENHOUSE kit sold by BRICK TRICK DUDE on Ebay.

REMINDER: Enlarge images simply by clicking on them.

Below: Parts contained in the custom building kit.

PARTS LIST
42 clear 1x2 bricks
12 clear 2x2 45-degree slopes
12 orange 1x2 45-degree slopes
8 orange 1x2 grills
18 orange 1x1 bricks
18 lime 1x1 caps
4 red 2x2 smooth tiles
1 green 8x16 base plate
12 green flower stalks (3 stems)
5 sprues of 4 dark pink flowers
4 sprues of 4 red flowers
4 green transparent cones
2 green bamboo leaf parts
2 yellow sunflowers
2 yellow transparent 1x1 caps
3 medium blue transparent 1x1 caps
1 black/gray gearshift
1 orange 2x4 plate
2 orange 1x2 bricks


Step 1: Attach red 2x2 smooth tiles to green 8x16 base plate to create “stepping stones”. Build 4 stacks of 3 clear 2x2 slopes for the roof. Using orange 1x1 bricks and lime 1x1 caps create 6 stacks of 3 alternating caps/bricks. Using 2 stacks of orange bricks/lime caps, add orange 1x4 arch brick and 2 orange grills as shown. Attach green transparent cones together creating 2 stacks of 2. Add green bamboo leaf, yellow sunflower and finish with yellow transparent 1x1 cap on each. Remove flowers from sprues by gently twisting. Place a flower on the end of each stem on all 12 green flower stalks. Stack stems/stalks in 6 bouquets of 2 as shown. Place orange 2x4 plate on orange 1x2 bricks to form garden table. Stack 3 medium blue transparent 1x1 caps and add gearshift to build water atomizer.


Step 2: Assemble clear 1x2 transparent bricks in 9 stacks of 4 bricks each. These stacks will form the greenhouse “walls”. With remaining 6 clear 1x2 bricks, create 2 assemblies of 3 bricks each stacked as shown. These assemblies form the greenhouse “gables”.


Step 3: Snap 3 wall sections in place as shown. Place sunflower on base plate between pegs.
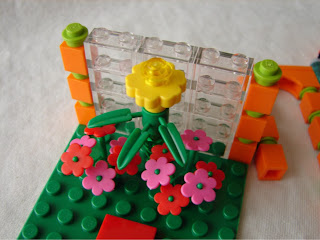

Step 4: Add orange/lime columns to back wall and flower bouquets to base plate.


Step 5: Add remaining columns and wall sections. Add gable section to back wall.


Step 6: Place orange 1x2 45-degree slopes on back wall as shown to begin roof structure.


Step 7: Carefully add clear slope assemblies and snap remaining gable to front wall.


Step 8: Continue roof structure by adding remaining orange 1x2 slopes to front wall.


Step 9: Carefully place the orange 1x2 grills along ridge to complete the roof structure.


Step 10: Add garden arch, table, water atomizer and sunflower to green base plate.


Step 11: Place remaining flower bouquets in “garden” as shown. Add minifigure.


Notes: Change the color of your greenhouse by simply replacing bricks, caps and/or slopes. Using your own brick collection pieces, consider adding flowers of alternate colors or sizes. Even add a tree or a bench seat so your minifig can take a break after a long gardening day.

Above: Another view of the finished ORANGE GREENHOUSE.

Monday, May 4, 2009

PEEP SHOW


Above: Female minifigure custom built from manufacturers new 2009 parts. We named her "DANI" and she drives an orange convertible car you can build from the BRICK TRICK DUDE kit.

PEEP SHOW

This posting features 5 of the custom female minifigures we've created to accompany some of our popular building kits.

Below: Chloe the Ice Cream Girl comes with the PINK ICE CREAM CART building kit. She has red lipstick and there is an alternate facial expression printed on the backside of her head.


Above: We named this female GAL PAL "BRITTANY". She is the driver that comes with the PINK CONVERTIBLE CAR kit sold exclusively on Ebay.

Below: This orange coverall-clad GAL PAL comes with the PURPLE & LIME QUAD BIKE custom building kit. For some reason we didn't get around to giving her a name like most of the other PEEPS we create. Who should she be?


Above: Wearing a floral print top and white pants is CAITLIN. She has dark red hair and she is included with the new PINK GAZEBO & PALM GARDEN kit which will be available in mid-May from BRICK TRICK DUDE on Ebay.

Friday, May 1, 2009

ORANGE ICE CREAM CART • BUILDING INSTRUCTIONS


Above: The ORANGE ICE CREAM CART shown assembled with male minifigure "Chaz".

ORANGE ICE CREAM CART • BUILDING INSTRUCTIONS

This posting contains the building instructions for the ORANGE ICE CREAM VENDOR CART kit sold by BRICK TRICK DUDE on Ebay.

REMINDER: Enlarge images by clicking on them.

Below: Parts included in the ORANGE ICE CREAM CART building kit.

PARTS LIST
1 white 2x2 finial brick
1 red 1x1 cap
1 orange 2x2 brick
9 lime 1x1 caps
1 orange 2x4 brick
2 light gray 2x2 axle plates
4 black tires on 4 gray rims
1 black 1x2 plate w/handle bars
1 light gray 1x2 printed tile
1 gray/black gearshift
1 white ice cream “scoops”
1 clear transparent goblet
1 orange transparent cone
1 green transparent cone
1 red transparent cone
3 medium blue transparent caps
3 yellow transparent caps


Step 1: Snap red cap on the top of the white 2x2 finial brick. Put wheels/rims on gray axle plates. Stack blue caps and add gearshift. Place “scoops” in goblet, add caps to cones.


Step 2: Place finial on top of orange 2x2 brick. Stack lime 1x1 caps to form sign post. Add black 1x2 plate with handles to one end of orange 2x4 brick as shown.


Step 3: Add the light gray1x2 printed tile to the orange cart “base” as shown in photo. Put ice cream “sign” on top of lime cap “post”.


Step 4: Arrange red & green cones with blue transparent caps/gear shift “pump” on orange brick “cart”. Add scoops/clear goblet and orange cone to black handle plate.


Step 5: Place sign on remaining cart peg on orange brick. Add the rim, tire and axle assemblies to the bottom of cart. Now your orange ice cream vendor cart is ready to roll!

PINK GAZEBO & PALM GARDEN • BUILDING INSTRUCTIONS

This new BRICK TRICK kit design will be available to view here soon.