WELCOME TO THE BRICK TRICK ONLINE STUDIO

Here you can view our designs, projects and building instructions.
Showing posts with label lime. Show all posts

Monday, February 9, 2015

CUSTOM MODULAR BUILDING: Lime Painted Lady Victorian Row House

Above: The Lime and Teal Victorian Row House project.

CUSTOM MODULAR BUILDING: Lime and Teal Painted Lady Victorian Row House

This posting features images and details for another in the series of BrickTrickDude custom modular buildings. The stylish Victorian interpretation is an original creation from the Brick Trick Dude building studio here in San Francisco and is one-of-a-kind.

EXTERIOR: The LIME & TEAL PAINTED LADY VICTORIAN ROW HOUSE project features 3 levels of space constructed on a 16x32 peg base plate.  The front exterior is decorated on the sidewalk level with flowers and plants, a classic tall stairway to the entrance, as well as a cool tile design in the sidewalk.  The back exterior has stairs from the living space to the ground level and basement access.  The building itself is a stylized creation reminiscent of 1900’s era homes of the past. The second floor exterior has tall windows, the front entrance and plenty of Victorian details; while the third floor exterior has another bay window and lots more architectural interest and color.  The entire front façade is a color scheme of lime green as well as medium lavender, dark teal, aqua, dark purple and green accents.  The back and sides of the building are lime with accents matching the front.  Modular construction techniques allow the roof and top floors to be removed for interior viewing and then easily re-stacked.

INTERIOR: The basement features a trash and recycling area and storage for boxes.  The second floor is the living room and kitchen, complete with a sofa, coffee table, computer desk, decorative table with floral arrangement and kitchen including sink, stove and refrigerator.  The third floor is a bedroom and bathroom with bed, dresser, table and chair, as well as sink, toilet and shower.

DETAILS: Project contains approximately 1,500 bricks and parts with many hard-to-find colors and includes three minifigures as shown, (2 females, one male).  The front sidewalk is constructed of white smooth tiles, (and accent colors), and does not match other building sidewalks of larger-scale architectural projects from the manufacturer.  Building stands approximately 11 7/8 inches tall at the highest point of the top façade molding.

NOTE: This sculpture was sold in January 2015.

REMINDER: Enlarge the images by clicking on them.

Above: The structure viewed from the back.

Above: The roof and upper floors lift off for access to the interior.

Above: The four modular units that combine to form the Lime and Teal Painted Lady Victorian Row House.

Saturday, November 8, 2014

RAINBOW "SKINNY BRICK TOWN" BUILDINGS

Above: "Skinny Brick Town" buildings arranged in a colorful rainbow.

RAINBOW "SKINNY BRICK TOWN" BUILDINGS

This post features buildings from the Skinny Brick Town project featured on the Brick Trick BLOG in October.  For this presentation, Brick Trick Artist Philip Buchan has arranged the structures by color to form a rainbow.

The twelve different colors included are, (from left to right), red, orange, yellow, lime, mint, green, teal, blue, purple, violet, magenta and pink.

REMINDER: Enlarge the images by clicking on them.

Above: Six buildings on the left side of the rainbow streetscape.

Above: The other end of the rainbow block.

Above: Details include colored transparent bricks to form "stained glass" windows in the green building.

Above: Some of the pieces, such as the violet bricks, are vintage colors that are no longer in production.


Tuesday, August 7, 2012

Lime Greenhouse Custom Building Kit Instructions

Above: LIME GREENHOUSE shown assembled with female minifigure.

LIME GREENHOUSE Custom Building Kit Instructions.

This posting provides images and directions to assemble the LIME GREENHOUSE custom building kit sold by BrickTrickDude exclusively on Ebay.

REMINDER: Enlarge the images by clicking on them.

Below: Parts included in the kit.
PARTS LIST
1 dark tan 6x8 plate
16 lime 1x1 bricks
12 lime 1x2 45-degree slopes
12 clear trans. 2x2 45-degree slopes
42 clear trans. 1x2 bricks
7 lime 1x2 smooth tiles
4 green stalks w/3 stems each
3 sprues of 4 red flowers
2 green trans. 1x1 cones
1 yellow 2x2 flower
1 orange 1x1 cap

Step 1: Begin by assembling all the components used to create the greenhouse.  Build 4 stacks of 3 clear transparent 2x2 slopes for the roof.  Create 4 stacks of 4 lime 1x1 bricks to serve as the columns at each corner of the greenhouse.  Remove red flowers from center sprues and place on green stems, stack stalks in 2 groups of two for bouquets.  Stack both green transparent 1x1 cones, add yellow 2x2 flower and top with the orange 1x1 cap to create the sunflower.  Build 9 stacks of 4 clear transparent 1x2 bricks.  Assemble the 2 “gable roof ends” by stacking 3 clear transparent 1x2 bricks as shown, and then add the lime 45-degree slopes.  Now you have all the components assembled to begin constructing the greenhouse.

Step 2: Begin by adding 3 stacks of clear 1x2 bricks and 2 stacks of lime 1x1 bricks to the dark tan 6x8 plate as shown to form the back wall of the greenhouse.  Then place one lime 1x2 tile on the dark tan plate as shown.

Step 3: Add the sunflower situated between four pegs at back of green plate as shown.

Step 4: Add the red flower bouquets to pegs on the green 6x8 plate as shown.

Step 5: Add 2 stacks of 1x2 clear bricks to each side of the dark tan 6x8 plate.

Step 6: Add remaining lime 1x1 columns and stacks of clear bricks to build front wall.

Step 7: Add one of the gable roof ends to the back wall of the greenhouse. 

Step 8: Carefully add the 4 stacks of clear slopes to build the greenhouse roof.

Step 9: Add the remaining gable roof end to the front wall of the greenhouse.

Step 10: Carefully add the lime 1x2 tiles to the roof; this will require a light touch.

Notes: Gripping the sides of the greenhouse when adding tiles on roof line eases application.

Above: LIME GREENHOUSE shown assembled with male minifigure.

Thursday, October 14, 2010

PASTRY CHEF VENDOR CART • BUILDING INSTRUCTIONS


Above: BrickTrickDude custom PASTRY CHEF VENDOR CART KIT shown assembled.

PASTRY CHEF VENDOR CART • BUILDING INSTRUCTIONS

This posting features images and instructions identical to the printed directions contained in this custom building kit designed here in our SAN FRANCISCO studio and available exclusively on Ebay.

REMINDER: Enlarge the images by clicking on them.

Below: Parts included in the custom building kit.

Parts List:
1 white 4x4 parabola
1 white antennae pole
1 lime 1x1 cap
1 dark gray 1x1 cylinder
1 white 1x1 cylinder
2 black/gray gearshifts
2 neon orange trans. 1x1 caps
1 dark gray 1x2 grill
1 white 2x6 plate
1 dark orange croissant
5 lime 1x2 plates
1 yellow &1 red mug
1 medium blue trans. 1x1 cap
1 dark blue trans. 1x1 cap
1 green trans. 1x1 cone
1 orange trans. 1x1 cone
1 black 2x2 plate
1 black 1x2 plate
1 black 1x2 plate w/handle
1 black 1x2 plate w/single peg
4 white rims
4 black slim rubber tires
2 light gray 2x2 plates w/axles

GUY PAL Minifigure “Chef Jason” is assembled.
1 white chef hat
1 smiley head w/scruff beard
1 white torso w/chef uniform
1 red hips/legs


Step 1: Place lime 1x1 cap on white 4x4 parabola and add to white antennae pole to form umbrella. Add gearshifts to white and dark gray 1x1 cylinders to build coffee dispensers. Add caps to cones to form bottles. Place tires on rims and add to axle plates.


Step 2: Add axle assemblies to bottom of white 2x6 plate to create cart chassis. Add lime 1x2 plates and neon orange transparent 1x1 caps as shown to top of white 2x6 plate.


Step 3: Place black 1x2 plate with handle on one end of cart as shown. Add black 1x2 plate w/single peg, and black 1x2 and 2x2 plates to lime plates as shown. Add grill to neon caps to complete pastry warmer.


Step 4: Add croissant to black plate with single peg. Place red and yellow mugs on cart along with coffee dispensers and bottles as shown or any way you prefer. Add umbrella and you’re ready for a day of sales!

Monday, August 16, 2010

CUSTOM MODULAR LIME GARDEN TOWNHOUSE


Above: Custom designed and artisan built, the LIME GARDEN TOWNHOUSE sculpture is currently up for auction on Ebay.

CUSTOM MODULAR LIME GARDEN TOWNHOUSE

This posting features images and descriptions for a custom-designed and artisan built original model from all new bricks and parts. While created to work with your other CITY, TOWN or TRAIN buildings in minifigure scale, this nicely detailed and finished brick sculpture will also work well as a stand-alone piece. The LIME GARDEN TOWNHOUSE is an original creation from the Brick Trick Dude building studio here in San Francisco and is one-of-a-kind.

EXTERIOR: The LIME GARDEN TOWNHOUSE project features 3 floors of space constructed on a 16x32 peg base plate. The front exterior is decorated on the ground level with a blooming garden, flowering tree and pristine white sidewalk. The second floor exterior has twin windows and the third floor exterior has a large dormer window with a sloped roof. The entire front façade is a bold color scheme of lime green, blue, dark turquoise, dark purple and orange. The back of the building has a ground floor door, deck and potting bench with flowers. There are windows with dark purple awnings on the second and third floors. Modular construction techniques allow the roof and top floors to be removed for interior viewing and then easily re-stacked.

INTERIOR: The living room occupies the interior of the ground floor. This room has a sectional sofa, coffee table with bouquet, electric piano/keyboard, and other furnishings. Note the painting on the wall over one of the sofas. The second floor is decorated as a kitchen and dining area with bright pink cabinets, counters with bottles and mug, stove, hood, sink, chair and a table with bottles and flower arrangement. The top floor is the bedroom complete with vanity table and perfume bottle, chair, bed, dresser and flowers.

DETAILS: Project contains approximately 1,200 bricks and parts and includes three minifigures as shown, (2 females, one male). The front sidewalk is constructed of white smooth tiles and does not match other building sidewalks of larger-scale architectural projects from the manufacturer. There are no technic bricks with holes on the sides for joining to other structures. Finished model weighs approximately 3 pounds. Model measures 5 inches wide and 10 inches deep at the base plate. Building stands 11 1/4 inches tall at the highest point of the roof ridgeline.

REMINDER: Enlarge the images by clicking on them.

Below: The rear view of the LIME GARDEN TOWNHOUSE.


Above: The roof lifts off for access and viewing, as do the second and third floors.

Below: The four units which stack to complete the LIME GARDEN TOWNHOUSE architectural sculpture.


Above: The LIME GARDEN TOWNHOUSE situated between the GRAND EMPORIUM and the FIRE BRIGADE which are kits from the brick manufacturer.

Sunday, September 6, 2009

Meet FERN, the new PINK FLOWER VENDOR KIOSK GIRL


Above: The MAGENTA PINK FLOWER VENDOR KIOSK shown assembled with female minifigure "Fern".

Meet FERN, the new PINK FLOWER VENDOR KIOSK GIRL

Greetings BRICK TRICK BLOG Friends!

The BRICK TRICK DUDE custom kit sold as the MAGENTA PINK FLOWER VENDOR KIOSK was very popular and sold out. That is, the version with blonde minifigure ZOEY. The new version of the kit, which is exactly the same except for the minifig, is again available from BRICK TRICK DUDE on Ebay. Brunette GAL PAL "FERN" takes over as the flower seller girl, directions for building this kit can be found HERE.

Monday, June 15, 2009

LIME & GREEN TRI-LEVEL APARTMENT


Above: The LIME & GREEN TRI-LEVEL APARTMENT from a city building series by BRICK TRICK artist PHILIP BUCHAN.

LIME & GREEN TRI-LEVEL APARTMENT

This posting features images of one of the many buildings in the TRI-LEVEL series, modeled after actual buildings here in SAN FRANCISCO.

Below: This shot shows the first level entry and garage doors.


Above: Ladder parts are used to create the fire escape. Transparent "smoke" windows are used in this sixties-inspired structure.


Above: The roof deck can be seen on this shot and is accessible via the fire escape ladder.

Friday, May 1, 2009

PINK GAZEBO & PALM GARDEN • BUILDING INSTRUCTIONS

This new BRICK TRICK kit design will be available to view here soon.

Saturday, April 25, 2009

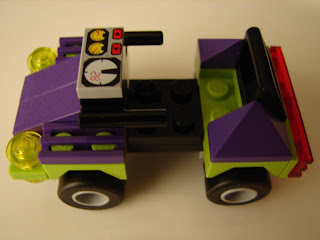
PURPLE & LIME QUAD BIKE • BUILDING INSTRUCTIONS


Above: The PURPLE and LIME QUAD BIKE shown assembled with a female minifigure.

PURPLE & LIME QUAD BIKE • BUILDING INSTRUCTIONS

This posting features images and direction to build the PURPLE & LIME QUAD BIKE designed by BRICK TRICK DUDE and sold exclusively on Ebay.

Below: Parts included in the BRICK TRICK DUDE custom building kit.

PARTS LIST
2 dark purple 1x2 grills
2 black 2x2 plates
2 dark purple 1x3 33-degree slopes
2 dark purple 1x2 3-sided slopes
1 gray printed 1x2 tile
1 black 1x2 plate w/handles
2 light gray 2x2 axle plates
1 black 2x4 plate
1 clear transparent 1x2 plate
2 lime 2x4 mudguard plates
4 yellow transparent caps
2 red transparent 1x2 grills
1 lime 1x4x2 angle plate
1 lime 1x4 plate
4 black tires on 4 gray rims
1 black 1x2 tile w/handle


Step 1: Place rims/tires on axle plates. Put gray printed 1x2 tile on black 1x2 plate with handles. Snap lime 2x4 mudguards on black 2x4 plate at each end on two pegs; add grills & slopes.


Step 2: Add black 2x2 plate and clear 1x2 plate to underside of chassis as shown. Place yellow transparent caps on lime 1x4 plate as shown.


Step 3: Add lime 1x4 to create front “bumper”. Place 2x2 black plate between lime mudguards. Add red transparent 1x2 grills to 1x4x2 lime angle plate to create taillights.


Step 4: Place both 1x3 33-degree slopes on front lime mudguard plate and over 2 remaining pegs of lime 1x4 plate. Add black 1x2 plate with handles and tile as shown.


Step 5: Add lime taillight assembly to rear mudguard and top with black tile/handle as shown in Step 4. Snap wheel assemblies to underside of chassis and add minifigure.


Above: PURPLE & LIME QUAD BIKE shown from another vantage point.

Monday, March 23, 2009

LIME & YELLOW 3 STORY ROW HOUSE


Above: The LIME & YELLOW 3 STORY ROW HOUSE by brick artist PHILIP BUCHAN.

Greetings BRICK TRICK BLOG Friends!

Philip has been busy with more work on the ROW HOUSE series of buildings. This example was first built using the DIGITAL DESIGNER, working from a photograph of an actual house here in SAN FRANCISCO not far from our studio. More images with details follow below.

Enjoy!

Below: The stairway makes a sharp turn and provides access to the lower door to the BASEMENT APARTMENT and the main front door on the porch above the garage.


Above: Close-up details of the upper floor windows built using clear transparent 1x2 plates.
Below: The garage door, (at right) on the first floor.


Above: More close-up details on the upper two floors.

Below: The tile pattern created on the roof. Note the chimney topped with green grills.


Above: The LIME & YELLOW 3 STORY ROW HOUSE placed next to other buildings from this series. The DARK GRAY & DARK PURPLE building, (at right), can be viewed in detail in a separate posting.