WELCOME TO THE BRICK TRICK ONLINE STUDIO

Here you can view our designs, projects and building instructions.

Friday, October 30, 2009

PURPLE & TEAL PICNIC TABLE • BUILDING INSTRUCTIONS


Above: The PURPLE & TEAL PICNIC TABLE kit shown assembled with a custom female minifigure we named Kimberly.

PURPLE & TEAL PICNIC TABLE • BUILDING INSTRUCTIONS

This posting features images and instructions to build the PURPLE & TEAL PICNIC TABLE sold on Ebay exclusively by BRICK TRICK DUDE.

REMINDER: Enlarge the images by clicking on them.

Below: Parts included in the BRICK TRICK DUDE custom building kit.

PARTS LIST
1 dark purple 4x4 parabola
1 orange 1x1 cap
1 orange 2x2 plate
1 white antennae pole
1 clear trans. goblet
1 yellow minifigure mug
1 red trans. 1x1 cap
1 green trans. 1x1 cone
1 dark blue trans. 1x1 cap
1 orange trans. 1x1 cone
2 dark turquoise 1x2 bricks
2 dark turquoise 2x3 33-degree inverse slopes
3 dark purple 2x4 plates

GAL PAL Minifigure “Kimberly” is assembled.
1 dark tan “bob cut” wig
1 female head w/eyebrows, red lipstick/alternate face
1 medium blue torso with printed blue overalls
1 blue hips/legs


Step 1: Place orange 1x1 cap on top peg of dark purple 4x4 parabola. Snap transparent caps on to transparent cones to create “soda bottles”. Place both dark turquoise 2x3 33-degree slopes on orange 2x2 plate as shown.


Step 2: Place dark purple parabola with orange cap on white antennae to complete the “umbrella”. Snap both dark turquoise 1x2 bricks on to the top of the table base assembly as shown.


Step 3: Add all three dark purple 2x4 plates to the base assembly to create the bench seats and picnic tabletop.


Step 4: Place the soda bottles, clear transparent goblet and minifigure mug on the table. These items can be arranged in any way you like.


Step 5: Complete your picnic table by adding the umbrella, placed between the remaining four pegs on the tabletop. Add a minifigure and you’re ready for a picnic!

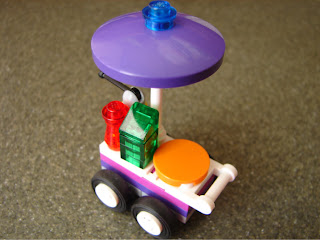
PURPLE PIZZA VENDOR CART • BUILDING INSTRUCTIONS


Above: The PURPLE PIZZA VENDOR CART shown assembled with a custom female minifigure we named Sophia.

PURPLE PIZZA VENDOR CART • BUILDING INSTRUCTIONS

This posting features images and instructions to build the PURPLE PIZZA VENDOR CART sold exclusively on Ebay by BRICK TRICK DUDE.

Below: Parts included in the BRICK TRICK DUDE custom kit.

PARTS LIST
1 dark purple 4x4 parabola
1 dark blue transparent 1x1 cap
1 red transparent 1x1 cap
1 red transparent 1x1 cone
1 green transparent 1x1x2/3 slope
3 green transparent 1x1 plates
1 black/gray gear shift
1 white antennae pole
1 dark purple 2x4 plate
1 light purple 2x4 plate
1 white 1x2 grill
1 orange 2x2 round tile
1 white 2x2 plate
1 white 1x2 plate w/handle
1 yellow 1x1 cylinder
4 white rims
4 black smooth rubber tires
2 light gray 2x2 axle plates

Custom GAL PAL Minifigure “Sophia” is assembled an includes:
1 dark tan “bob cut” wig
1 female head w/eyebrows, red lipstick/alternate face
1 red torso
1 white hips/legs


Step 1: Place tires on rims. Snap blue cap on to top peg of dark purple parabola. Add red cap to red transparent cone. Stack green transparent 1x1 plates, top with green transparent slope. Add gear shift to yellow 1x1 cylinder. Stack purple 2x4 plates.


Step 2: Place dark purple parabola “umbrella” on white antennae. Snap white 2x2 plate, white 1x2 grill and white 1x2 plate with handle to the top of purple 2x4 plate stack. Add rims/tires to stud pegs on light gray 2x2 axle plates.


Step 3: Add the red “pepper flakes shaker”, the green “oregano bottle”, the yellow “cheese dispenser”, and orange pizza to the pink cart as shown.


Step 4: Place the umbrella on the remaining peg on the white 2x2 plate. Add the rim, tire and axle assemblies to the bottom of the purple 2x4 plates.


Alternatives: Condiments and other items can be arranged on the pizza cart pegs any way you like. Replace the purple plates and/or parabola to easily change the cart color scheme.

PINK ICE CREAM TRUCK (Design #2) • BUILDING INSTRUCTIONS

PINK ICE CREAM TRUCK (Design #2) • BUILDING INSTRUCTIONS

This area will be available shortly.

Wednesday, October 28, 2009

PINK & PURPLE AIRPLANE • BUILDING INSTRUCTIONS


Above: The PINK & PURPLE AIRPLANE kit shown assembled with female minifigure AMELIA.

PINK & PURPLE AIRPLANE • BUILDING INSTRUCTIONS

This posting features images and directions to build the PINK & PURPLE AIRPLANE kit sold by BRICK TRICK DUDE exclusively on Ebay.

Below: Parts included in the BRICK TRICK DUDE custom building kit.

PARTS LIST
1 white 1x2 with side stud
1 black propeller
2 dark purple 1x2 grills
8 white 1x2 smooth tiles
2 dark pink 2x2 bricks
1 clear transparent 2x2 45-degree slope
1 black/white steering wheel
1 white 1x2 tile w/panel
1 white 1x2 tile w/tailfin
3 dark purple 2x4 plates
1 white 2x8 plate
2 white 1x2 plates w/handle
2 black tires
2 gray rims
1 light gray 2x2 axle plate

Minifigure Pilot “Amelia” is assembled and includes:
1 white helmet w/red & green stripes
1 medium blue transparent visor
1 female head w/red lipstick and alternate face on back
1 green/red “Team 96” torso
1 green hips/legs


Step 1: Attach propeller to white 1x2 brick with stud. Place 1 white 1x2 tile on clear 2x2 slope. Add tires/rims to pegs on axle plate. Place dark pink 2x2 bricks on white 2x8 plate as shown.


Step 2: Add the steering wheel and both white 1x2 plates with handles to the white 2x8 airplane chassis assembly.


Step 3: Attach 1 white 1x2 tile to propeller assembly. Place clear 2x2 slope centered on 2 dark purple 2x4 plates, add tiles/grills as shown. Add white tile w/panel, tailfin, white 1x2 tiles to dark purple 2x4 plate.


Step 4: Place propeller assembly on 2 remaining pegs of white chassis plate. Add front and rear wing assemblies to the dark pink 2x2 bricks.


Step 5: Attach the wheels to the underside of airplane parallel to front wings. Add your minifigure pilot and you’re ready to fly!

Wednesday, October 21, 2009

PINK COFFEE VENDOR CART (Design #2) • BUILDING INSTRUCTIONS


Above: The PINK COFFEE VENDOR CART shown assembled with a female minifigure.

PINK COFFEE VENDOR CART (Design #2) • BUILDING INSTRUCTIONS

This posting contains imags and instructions to build the PINK COFFEE VENDOR CART (Design #2), a custom kit sold by BRICK TRICK DUDE exclusively on Ebay.

REMINDER: Enlarge the images by clicking on them.

Below: Parts included in the BRICK TRICK DUDE custom kit.

PARTS LIST
1 red transparent 1x1 cap
1 dark pink 4x4 parabola
1 white antennae pole
1 bright pink 2x4 brick
1 orange transparent 1x1x2/3 slope
1 orange 1x1 brick
2 yellow transparent 1x1 caps
1 green transparent 1x1 cone
1 red transparent 1x1 cone
1 red minifigure mug
3 dark blue trans. 1x1 caps
1 black/gray gearshift
1 white 2x2 plate
1 white 1x2 tile w/panel
1 white 1x2 plate w/handle
2 light gray 2x2 axle plates
4 smooth black rubber tires
4 white rims


Step 1: Place tires on rims. Snap red transparent cap on to top peg of dark pink parabola. Add orange transparent slope to orange 1x1 brick. Add yellow transparent caps to red and green transparent cones. Stack dark blue transparent caps and add gearshift.


Step 2: Place dark pink parabola “umbrella” on white antennae. Snap white 2x2 plate, white 1x2 tile with panel and white 1x2 plate with handle to the top of bright pink 2x4 brick. Add rims/tires to stud pegs on light gray 2x2 axle plates.


Step 3: Add the red and green “condiment bottles”, the orange “juice carton”, the blue “coffee thermos pump” and red mug to the pink cart as shown.


Step 4: Place the umbrella on the remaining peg on the white 2x2 plate. Add the rim, tire and axle assemblies to the bottom of the bright pink 2x4 brick.


Alternatives: Condiments and other items can be arranged on the coffee cart pegs any way you like. Simply replacing the pink brick and/or parabola can change the cart color scheme.

Wednesday, October 7, 2009

PINK CHERRY BLOSSOM TREE & PARK BENCH with MIYOKO • BUILDING INSTRUCTIONS


Above: The PINK CHERRY BLOSSOM TREE & PARK BENCH with female minigifure MIYOKO shown fully assembled.

PINK CHERRY BLOSSOM TREE & PARK BENCH with MIYOKO • BUILDING INSTRUCTIONS

This posting features images and directions to build the PINK CHERRY BLOSSOM TREE & PARK BENCH with MIYOKO sold exclusively by BRICK TRICK DUDE on Ebay. These dircetions are identical to the printed instructions included with the custom kit.

REMINDER: Enlarge the images by simply clicking on them.

Below: Parts included in the BRICK TRICK DUDE custom building kit.

PARTS LIST
3 bright green large leaf parts
1 dark gray 6x6 plate
2 brown minifigure chairs
1 brown 2x2 plate
6 brown 1x1 bricks
3 green stalks w/3 stems each
1 brown 2x4 brick
1 white 1x4 picket fence
5 green 1x4 smooth tiles
9 sprues of 4 dark pink flowers

GAL PAL MinifigureMiyoko” is assembled and includes:
1 red “ponytail” wig
1 smiley head w/eyebrows, red lipstick/alternate face
1 white floral torso
1 white hips/legs


Step 1: Place both brown chairs on brown 2x4 brick to form “park bench”. Stack brown 1x1 bricks in an irregular manner. Attach all three bright green leaf parts by stacking on the single outer peg as shown.

Step 2: Place sprues of dark pink flowers on green stalks. Use one entire four-flower sprue per stem.
DO NOT REMOVE flowers from center sprue part.


Step 3: Add the flower and stem assemblies to the center peg on the top of each bright green leaf part. This completes the cherry blossom flower and tree branch canopy.


Step 4: Place the brown 2x2 plate, the white picket fence and the green 1x4 smooth tiles on the dark gray 6x6 plate as shown. In the remaining space add the “bench” assembly.

Step 5: Add the stack of brown 1x1 bricks to a peg on brown 2x2 plate to serve as tree trunk. Carefully place the tree canopy on top of the 1x1 stack so the assembly is centered on trunk.


Above: Custom created female minifigure we named MIYOKO, which is included in the PINK CHERRY BLOSSOM TREE & PARK BENCH kit. Miyoko is a Japanese name which means, "Beautiful Generation's Child".*

*Source: Female baby names on www.babynology.com