WELCOME TO THE BRICK TRICK ONLINE STUDIO

Here you can view our designs, projects and building instructions.
Showing posts with label pink convertible caddy. Show all posts

Sunday, December 13, 2009

PINK & MAGENTA CONVERTIBLE CAR KIT with GAL PAL HANNAH


Above: The PINK & MAGENTA CAR KIT shown assembled with a new female minifigure we named HANNAH. After receiving numerous requests for car kits with "blonde" figures, we're offering this popular pink vehicle building kit with GAL PAL HANNAH wearing a white floral print blouse and blue pants. This kit is available until sold out from BRICK TRICK DUDE on Ebay, CLICK HERE.

Thursday, January 15, 2009

PINK CONVERTIBLE • BUILDING DIRECTIONS


Above: Finished model with female minifigure.

PINK CONVERTIBLE • BUILDING DIRECTIONS

Below: Parts included in the BRICK TRICK DUDE kit available on Ebay.

PARTS LIST
1 red 2x8 plate
3 white 2x4 plates2 gray 2x2 axel plates
4 gray rims
4 black rubber tires
4 dark pink 1x4 arch bricks
2 dark pink 1x2 slopes
2 white 1x1 slopes
2 red 1x4x2 angle plates
2 amber transparent caps
1 red transparent 1x2 grill
2 red transparent 1x1 cones
9 white 1x2 smooth tiles
1 clear 2x4x2 wind shield
1 black/white steering wheel
1 white minifigure seat
2 bright pink 1x1 caps
4 dark pink 1x1 bricks
4 clear transparent 1x2 plates


Step 1: Begin by placing black rubber tires on gray rims. Add white 1x1 slopes to dark pink 1x2 45-degree slopes.Snap bright pink 1x1 caps to pegs on top of the windshield. Assemble clear transparent 1x2 plates into two stacksof two plates each.


Step 2: Begin chassis assembly by placing white 2x4 plates and gray 2x2 axel plates on the red 2x8 plate as shown.


Step 3: Add 1 white 1x2 smooth tile, minifig seat, steering wheel and 1x1 dark pink bricks as shown.
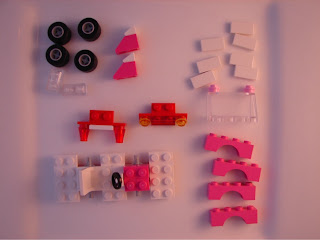

Step 4: Use 1x4x2 red angle parts and add red transparent cones and 1 white smooth tile to one, while adding amber caps and red grill to the other.


Step 5: Place headlight and taillight assemblies on chassis.


Step 6: Attach dark pink 1x4 arch bricks to form fenders.


Step 7: Add windshield. Place the dark pink/white slope assemblies to form tail “fins”.


Step 8: Add remaining white 1x2 smooth tiles to finish “hood” and car “body”.


Step 9: Carefully add the wheel assemblies and you’re ready to roll!


Notes: Change the color of your car by simply replacing the dark pink arch bricks and slopes with bricks of another color.

Sunday, January 11, 2009

BRITTANY and her HOT PINK CONVERTIBLE


Above: A female minfigure named Brittany drives this sporty HOT PINK CONVERTIBLE designed by BRICK TRICK artists Philip and Mitch.

Greetings BRICK TRICK BLOG Friends!

We've been working on various cars here in the studio and Mitch came up with this version with some input from Philip during the design and building session. Mitch uses dark pink 1x4 arch bricks to create the car "fenders" which conveniently fit right around these chunky tires. Directions to build this model will follow in a separate posting and you can use your own bricks or purchase a kit from BRICK TRICK DUDE on Ebay to create an exact replica.

Below: The HOT PINK CONVERTIBLE from the rear view shows off the "torpedo" tail lights created using red transparent cones. The "fins" are built using dark pink slopes topped of with white 1x1 slope bricks.

Saturday, December 27, 2008

PINK CONVERTIBLE


Above: The PINK CONVERTIBLE is constructed of white, pink, red and dark magenta bricks and parts.

PINK CONVERTIBLE

This posting features shots of the PINK CONVERTIBLE designed and built by brick artists PHILIP and MITCH working together. Cool features are the "torpedo" tail lights, the big white "fins" and of course the pink factor. This is the vehicle used in the CAMILLE'S CHRISTMAS CONVERTIBLE CALAMITY video featured on YouTube.

If you missed CAMILLE and her Internet debut, CLICK HERE.

Below: Another view of the PINK CONVERTIBLE, which uses a dark magenta slope for the "hood".


Above: This back view shows off the torpedo-style tail lights created with red transparent cones.

Sunday, December 21, 2008

CAMILLE'S CHRISTMAS CONVERTIBLE CALAMITY • YouTUBE Video


Video features blooper footage from SAN FRANCISCO brick artists showing car and driver which wouldn't cooperate during the filming of the 2008 HOLIDAY TOWN video.

HOLIDAY TOWN PRESENTATION • Images 16-21


Above: At one end of town a residential block is home to the POWDER BLUE BASEMENT HOUSE and the RED & BLACK ROW HOUSE #2.

HOLIDAY TOWN PRESENTATION • IMAGES 16-21

Happy Holidays!

Following in this posting are more shots of the BRICK TRICK HOLIDAY TOWN. You'll see images featuring several of the buildings which comprise six blocks!

NOTE: Click on any image to see an enlargement.

Below: Behind the YELLOW & WHITE ROW HOUSE is this bold LIME & PURPLE LOFT home.


Above: The LIME & PURPLE LOFT has an archway entrance, glass block windows and the roof lifts off to access an interior LED light.

Below: The SUNNY YELLOW COTTAGE structure which launched the HOLIDAY TOWN project.

Above: The YELLOW & RED ROW HOUSE has a grand stairway entrance.

Below: A view of the HOLIDAY TOWN PARK where the CHRISTMAS PAGEANT is taking place right in the center of the city. Also visible are the surrounding blocks and buildings. Can you spot "Camille" driving her new PINK CONVERTIBLE CADDY which she just got for Christmas?