WELCOME TO THE BRICK TRICK ONLINE STUDIO

Here you can view our designs, projects and building instructions.
Showing posts with label greenhouse. Show all posts

Tuesday, August 7, 2012

Lime Greenhouse Custom Building Kit Instructions

Above: LIME GREENHOUSE shown assembled with female minifigure.

LIME GREENHOUSE Custom Building Kit Instructions.

This posting provides images and directions to assemble the LIME GREENHOUSE custom building kit sold by BrickTrickDude exclusively on Ebay.

REMINDER: Enlarge the images by clicking on them.

Below: Parts included in the kit.
PARTS LIST
1 dark tan 6x8 plate
16 lime 1x1 bricks
12 lime 1x2 45-degree slopes
12 clear trans. 2x2 45-degree slopes
42 clear trans. 1x2 bricks
7 lime 1x2 smooth tiles
4 green stalks w/3 stems each
3 sprues of 4 red flowers
2 green trans. 1x1 cones
1 yellow 2x2 flower
1 orange 1x1 cap

Step 1: Begin by assembling all the components used to create the greenhouse.  Build 4 stacks of 3 clear transparent 2x2 slopes for the roof.  Create 4 stacks of 4 lime 1x1 bricks to serve as the columns at each corner of the greenhouse.  Remove red flowers from center sprues and place on green stems, stack stalks in 2 groups of two for bouquets.  Stack both green transparent 1x1 cones, add yellow 2x2 flower and top with the orange 1x1 cap to create the sunflower.  Build 9 stacks of 4 clear transparent 1x2 bricks.  Assemble the 2 “gable roof ends” by stacking 3 clear transparent 1x2 bricks as shown, and then add the lime 45-degree slopes.  Now you have all the components assembled to begin constructing the greenhouse.

Step 2: Begin by adding 3 stacks of clear 1x2 bricks and 2 stacks of lime 1x1 bricks to the dark tan 6x8 plate as shown to form the back wall of the greenhouse.  Then place one lime 1x2 tile on the dark tan plate as shown.

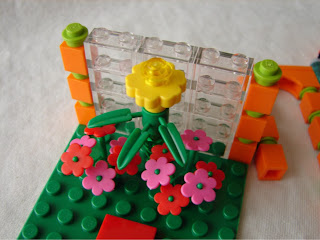
Step 3: Add the sunflower situated between four pegs at back of green plate as shown.

Step 4: Add the red flower bouquets to pegs on the green 6x8 plate as shown.

Step 5: Add 2 stacks of 1x2 clear bricks to each side of the dark tan 6x8 plate.

Step 6: Add remaining lime 1x1 columns and stacks of clear bricks to build front wall.

Step 7: Add one of the gable roof ends to the back wall of the greenhouse. 

Step 8: Carefully add the 4 stacks of clear slopes to build the greenhouse roof.

Step 9: Add the remaining gable roof end to the front wall of the greenhouse.

Step 10: Carefully add the lime 1x2 tiles to the roof; this will require a light touch.

Notes: Gripping the sides of the greenhouse when adding tiles on roof line eases application.

Above: LIME GREENHOUSE shown assembled with male minifigure.

Monday, September 13, 2010

RED & GREEN HOLIDAY GREENHOUSE KIT


Above: The RED & GREEN HOLIDAY GREENHOUSE and FLOWER VENDOR custom building kit from BRICK TRICK DUDE available only on Ebay.

RED & GREEN HOLIDAY GREENHOUSE and FLOWER VENDOR

This is a new custom building kit from BrickTrickDude for the 2010 holiday season. There are only a few, and you can have a male or female minifigure while supplies last. Currently instructions for this kit are only available in print version when purchasing the kit.

The custom building kit includes everything you see in the images to build the greenhouse, which has flowers inside; as well as the rest of the layout which features a potting bench, water pump, cash register for sales, a picket fence, wavy flag, colorful tiled walkway and lots more flowers!

Find all the BrickTrickDude offerings on Ebay, CLICK HERE.

Below: The RED & GREEN HOLIDAY GREENHOUSE with a blonde female minifigure.

Saturday, May 9, 2009

ORANGE GREENHOUSE • BUILDING INSTRUCTIONS


Above: The ORANGE GREENHOUSE kit shown assembled with male minifigure "ADAM".

ORANGE GREENHOUSE • BUILDING INSTRUCTIONS

This posting features directions to build the ORANGE GREENHOUSE kit sold by BRICK TRICK DUDE on Ebay.

REMINDER: Enlarge images simply by clicking on them.

Below: Parts contained in the custom building kit.

PARTS LIST
42 clear 1x2 bricks
12 clear 2x2 45-degree slopes
12 orange 1x2 45-degree slopes
8 orange 1x2 grills
18 orange 1x1 bricks
18 lime 1x1 caps
4 red 2x2 smooth tiles
1 green 8x16 base plate
12 green flower stalks (3 stems)
5 sprues of 4 dark pink flowers
4 sprues of 4 red flowers
4 green transparent cones
2 green bamboo leaf parts
2 yellow sunflowers
2 yellow transparent 1x1 caps
3 medium blue transparent 1x1 caps
1 black/gray gearshift
1 orange 2x4 plate
2 orange 1x2 bricks


Step 1: Attach red 2x2 smooth tiles to green 8x16 base plate to create “stepping stones”. Build 4 stacks of 3 clear 2x2 slopes for the roof. Using orange 1x1 bricks and lime 1x1 caps create 6 stacks of 3 alternating caps/bricks. Using 2 stacks of orange bricks/lime caps, add orange 1x4 arch brick and 2 orange grills as shown. Attach green transparent cones together creating 2 stacks of 2. Add green bamboo leaf, yellow sunflower and finish with yellow transparent 1x1 cap on each. Remove flowers from sprues by gently twisting. Place a flower on the end of each stem on all 12 green flower stalks. Stack stems/stalks in 6 bouquets of 2 as shown. Place orange 2x4 plate on orange 1x2 bricks to form garden table. Stack 3 medium blue transparent 1x1 caps and add gearshift to build water atomizer.


Step 2: Assemble clear 1x2 transparent bricks in 9 stacks of 4 bricks each. These stacks will form the greenhouse “walls”. With remaining 6 clear 1x2 bricks, create 2 assemblies of 3 bricks each stacked as shown. These assemblies form the greenhouse “gables”.


Step 3: Snap 3 wall sections in place as shown. Place sunflower on base plate between pegs.


Step 4: Add orange/lime columns to back wall and flower bouquets to base plate.


Step 5: Add remaining columns and wall sections. Add gable section to back wall.


Step 6: Place orange 1x2 45-degree slopes on back wall as shown to begin roof structure.


Step 7: Carefully add clear slope assemblies and snap remaining gable to front wall.


Step 8: Continue roof structure by adding remaining orange 1x2 slopes to front wall.


Step 9: Carefully place the orange 1x2 grills along ridge to complete the roof structure.


Step 10: Add garden arch, table, water atomizer and sunflower to green base plate.


Step 11: Place remaining flower bouquets in “garden” as shown. Add minifigure.


Notes: Change the color of your greenhouse by simply replacing bricks, caps and/or slopes. Using your own brick collection pieces, consider adding flowers of alternate colors or sizes. Even add a tree or a bench seat so your minifig can take a break after a long gardening day.

Above: Another view of the finished ORANGE GREENHOUSE.

Wednesday, December 17, 2008

PINK GREENHOUSE BUILDING INSTRUCTIONS


Above: Image of the PINK GREENHOUSE custom building kit shown fully assembled with a minifigure GAL PAL wearing green overalls.

PINK GREENHOUSE • BUILDING INSTRUCTIONS


Below: Parts included in the kit to build the project.

PARTS LIST
42 clear 1x2 bricks
12 clear 2x2 45-degree slopes
12 dark pink 1x2 slopes
6 dark gray 1x2 grills
20 dark pink 1x1 bricks
4 white picket fences
2 white 1x1 slopes
8 white 1x2 smooth tiles
1 green 8x16 base plate
10 green flower stalks (3 stems)
16 dark pink flowers
8 red flowers
8 white flowers
2 green transparent cones
1 light green large triple leaf
1 yellow sunflower


Step 1: Attach white 1x2 smooth tiles to green 8x16 base plate as shown to create “stepping stones”. Create 4 stacks of 3 clear 2x2 slopes for the roof. Using dark pink 1x1 bricks, create 4 stacks of 4 and 2 stacks of 2. Add white 1x1 slopes to both stacks of two-brick 1x1 dark pink bricks as shown to finish “fence posts” with a finial. Stack 2 green transparent cones. Add light green triple leaf and finish with yellow sunflower. Remove flowers from sprues by gently twisting. Place a flower on the end of each stem, (you’ll need 30 flowers and 32 are supplied). Stack stems in bouquets of 2 as shown. Flower colors can be arranged as shown or as you choose.


Step 2: Assemble clear 1x2 transparent bricks in 9 stacks of 4 bricks each. These stacks will form the greenhouse “walls”. With remaining 6 clear 1x2 bricks, create 2 assemblies of 3 bricks each stacked as shown. These assemblies form the greenhouse “gables”.


Step 3: Snap 3 wall sections in place as shown. Place sunflower on base plate between pegs.


Step 4: Add pink columns to back wall and flower bouquets to base plate.


Step 5: Add remaining columns and wall sections. Add gable section to back wall.


Step 6: Place dark pink 1x2 45-degree slopes on back wall as shown to begin roof structure.


Step 7: Carefully add clear slope assemblies and snap remaining gable to front wall.


Step 8: Continue roof structure by adding remaining dark pink 1x2 slopes to front wall.


Step 9: Carefully place the dark gray 1x2 grills along ridge to complete the roof structure.


Step 10: Add white picket fences and dark pink fence post assemblies to base plate.


Step 11: Place remaining flower bouquets in “garden” as shown.


Notes: Change the color of your greenhouse by simply replacing 1x1 bricks and 1x2 slopes. Using your own brick collection pieces, consider adding flowers of alternate colors or sizes. Even add a tree or a bench seat so your minifig can take a break after a long gardening day.

Wednesday, December 10, 2008

BRICK GREENHOUSE and PINK GROW HOUSE


Above: A new design by brick artist MITCH HIGHTOWER features a greenhouse filled with flowers and a GAL PAL minifigure tending the garden.

Greetings!

Desite the busy time of year and lots going on in and around the studio, we're still managing to come up with more kit ideas. The giant pile of new bricks which just arrived is helping with our motivation as is the festive holiday season. This posting shows some brick "greenhouses" designed and built by MITCH. Be sure to check out the HOT PINK version further in this posting. These brick sculptures use clear transparent bricks and slopes for the greenhouse walls and roof. The GREENHOUSE is also packed with flowers! Other cool details are the picket fence with posts and finials, and white tile "stepping stones".


Above: The brick GREENHOUSE with a male minifig wearing blue overalls and a ball cap.

Below: A version of the greenhouse constructed with dark pink bricks and slopes.