WELCOME TO THE BRICK TRICK ONLINE STUDIO

Here you can view our designs, projects and building instructions.
Showing posts with label hot pink convertible. Show all posts

Monday, May 4, 2009

PEEP SHOW


Above: Female minifigure custom built from manufacturers new 2009 parts. We named her "DANI" and she drives an orange convertible car you can build from the BRICK TRICK DUDE kit.

PEEP SHOW

This posting features 5 of the custom female minifigures we've created to accompany some of our popular building kits.

Below: Chloe the Ice Cream Girl comes with the PINK ICE CREAM CART building kit. She has red lipstick and there is an alternate facial expression printed on the backside of her head.


Above: We named this female GAL PAL "BRITTANY". She is the driver that comes with the PINK CONVERTIBLE CAR kit sold exclusively on Ebay.

Below: This orange coverall-clad GAL PAL comes with the PURPLE & LIME QUAD BIKE custom building kit. For some reason we didn't get around to giving her a name like most of the other PEEPS we create. Who should she be?


Above: Wearing a floral print top and white pants is CAITLIN. She has dark red hair and she is included with the new PINK GAZEBO & PALM GARDEN kit which will be available in mid-May from BRICK TRICK DUDE on Ebay.

Thursday, January 15, 2009

PINK CONVERTIBLE • BUILDING DIRECTIONS


Above: Finished model with female minifigure.

PINK CONVERTIBLE • BUILDING DIRECTIONS

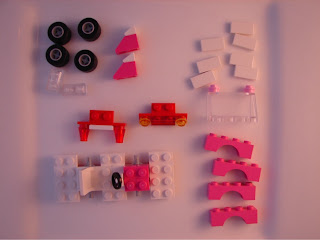
Below: Parts included in the BRICK TRICK DUDE kit available on Ebay.

PARTS LIST
1 red 2x8 plate
3 white 2x4 plates2 gray 2x2 axel plates
4 gray rims
4 black rubber tires
4 dark pink 1x4 arch bricks
2 dark pink 1x2 slopes
2 white 1x1 slopes
2 red 1x4x2 angle plates
2 amber transparent caps
1 red transparent 1x2 grill
2 red transparent 1x1 cones
9 white 1x2 smooth tiles
1 clear 2x4x2 wind shield
1 black/white steering wheel
1 white minifigure seat
2 bright pink 1x1 caps
4 dark pink 1x1 bricks
4 clear transparent 1x2 plates


Step 1: Begin by placing black rubber tires on gray rims. Add white 1x1 slopes to dark pink 1x2 45-degree slopes.Snap bright pink 1x1 caps to pegs on top of the windshield. Assemble clear transparent 1x2 plates into two stacksof two plates each.


Step 2: Begin chassis assembly by placing white 2x4 plates and gray 2x2 axel plates on the red 2x8 plate as shown.


Step 3: Add 1 white 1x2 smooth tile, minifig seat, steering wheel and 1x1 dark pink bricks as shown.


Step 4: Use 1x4x2 red angle parts and add red transparent cones and 1 white smooth tile to one, while adding amber caps and red grill to the other.


Step 5: Place headlight and taillight assemblies on chassis.


Step 6: Attach dark pink 1x4 arch bricks to form fenders.


Step 7: Add windshield. Place the dark pink/white slope assemblies to form tail “fins”.


Step 8: Add remaining white 1x2 smooth tiles to finish “hood” and car “body”.


Step 9: Carefully add the wheel assemblies and you’re ready to roll!


Notes: Change the color of your car by simply replacing the dark pink arch bricks and slopes with bricks of another color.

Sunday, January 11, 2009

BRITTANY and her HOT PINK CONVERTIBLE


Above: A female minfigure named Brittany drives this sporty HOT PINK CONVERTIBLE designed by BRICK TRICK artists Philip and Mitch.

Greetings BRICK TRICK BLOG Friends!

We've been working on various cars here in the studio and Mitch came up with this version with some input from Philip during the design and building session. Mitch uses dark pink 1x4 arch bricks to create the car "fenders" which conveniently fit right around these chunky tires. Directions to build this model will follow in a separate posting and you can use your own bricks or purchase a kit from BRICK TRICK DUDE on Ebay to create an exact replica.

Below: The HOT PINK CONVERTIBLE from the rear view shows off the "torpedo" tail lights created using red transparent cones. The "fins" are built using dark pink slopes topped of with white 1x1 slope bricks.