WELCOME TO THE BRICK TRICK ONLINE STUDIO

Here you can view our designs, projects and building instructions.

Thursday, July 8, 2010

DELUXE PINK FLOWER VENDOR KIOSK & TREE BUILDING KIT INSTRUCTIONS


Above: The DELUXE PINK FLOWER VENDOR KIOSK & TREE custom building kit shown assembled with gal pal Lily.

DELUXE PINK FLOWER VENDOR KIOSK & TREE BUILDING KIT INSTRUCTIONS

This posting features images and directions for this custom brick building kit sold by BrickTrickDude exclusively on Ebay. Visit the BrickTrickDude online store, CLICK HERE. Check out this custom kit, CLICK HERE.

REMINDER: Enlarge the images by clicking on them.

Below: Parts included in the BrickTrickDude custom building kit for this project.

PARTS LIST
3 green leaf parts
1 green bamboo leaf
1 dark pink transparent 2x2 flower
1 white 2x6 plate
5 green stalks w/3 stems
7 brown 1x1 bricks
17+ green transparent 1x1 plates
1 bright green 6x12 plate
4 sprues of 4 dark pink flowers
1 sprue of 4 red flowers
1 sprue of 4 white flowers
5 green transparent 1x1x2/3 slopes
5+ orange 1x1 caps
1 bright pink 2x4 brick
1 dark pink 1x4 brick arch
3 dark pink 1x2 45-degree slopes
3 white 1x2 45-degree slopes
6 dark pink 1x1 bricks
1 lime 1x1 cap
3 dark blue transparent 1x1 caps
1 black/gray gear shift

GAL PAL Minifigure “Lily” is assembled and includes:
1 dark tan “bob cut” wig
1 smiley head w/eyebrows, red lipstick/alternate face
1 white torso w/floral pattern
1 violet hips/legs


Step 1: Snap the 3 green leaf parts together to form a branch canopy as shown. Using 3 sprues of the dark pink flowers, attach to one stem as shown and DO NOT REMOVE FLOWERS FROM SPRUE. Place lime 1x1 cap on top of dark pink transparent 2x2 flower. Stack brown 1x1 bricks in an irregular fashion to form tree trunk. Using 5 green transparent 1x1 plates, build a stack. Repeat to build a second stack using 6 green transparent 1x1 plates. Use the remaining dark pink sprue of 4 flowers and the red and white flowers; remove from sprues by twisting gently and place on stems. Stack stems in 2 pairs of two, forming bouquets. Stack 5 orange 1x1 caps and place on top of green bamboo leaf part. Stack 3 dark blue transparent 1x1 caps and top with gearshift to form water bottle. Alternate dark pink and white 1x2 45-degree slopes and place on top of white 2x6 plate to build awning. Stack six remaining green transparent 1x1 plates alternating with 4 dark pink 1x1 bricks as shown. With these elements prepared you can move on to constructing the vignette.


Step 2: Add branch canopy to tree trunk. Place bright pink 2x4 brick on bright green 6x12 plate as shown. Place flowers on bright pink 1x1 bricks and green transparent stack of 1x1 plates, which serve as the vases. Add dark pink transparent flower to stack of 5 green transparent plates to complete the flower kiosk signage. Place 5 green transparent 1x1x2/3 slopes on awning as shown, noting that second peg from left side remains blank. Add dark pink 1x4 brick arch to stacks of dark pink bricks and green transparent plates.


Step 3: Add arch assembly to bright pink 2x4 brick. Place tree on bright green plate and add assembly of dark pink flowers to the center top peg of branch canopy.


Step 4: Add awning to form kiosk and place water bottle on bright pink brick.


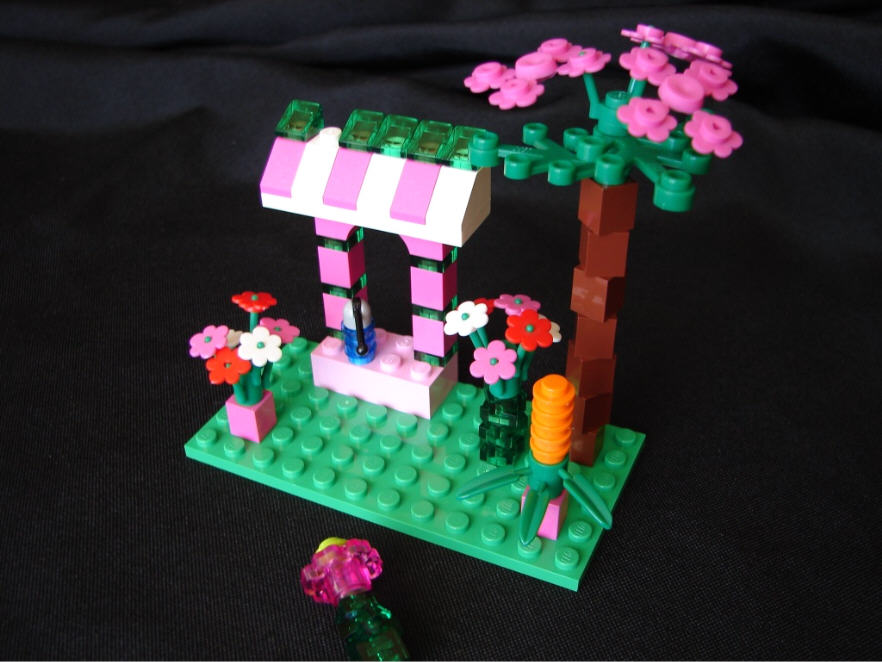
Step 5: Place flowers and vases as shown or any way you like.


Step 6: Place flower signage on remaining peg of awning. Add your minifigure and you are ready for a busy day of flower sales in your brick town!

Monday, June 21, 2010

CUSTOM MODULAR PINK ICE CREAM & CANDY SHOP


Above: A custom designed and built Brick Trick Dude building sculpture which is currently up for auction on Ebay.

CUSTOM MODULAR PINK ICE CREAM SHOP for CITY/TOWN/TRAIN

Greetings! This posting features images of a custom-designed and artisan built original model from all new bricks and parts. While created to work with your other CITY, TOWN or TRAIN buildings in minifigure scale, this nicely detailed and finished brick sculpture will also work well as a stand-alone piece. The PINK ICE CREAM & CANDY SHOP project is being sold fully assembled, as shown in the images. The PINK ICE CREAM & CANDY SHOP is an original creation from the Brick Trick Dude building studio here in San Francisco and is one-of-a-kind. Find out more and bid on the auction for this brick sculpture, CLICK HERE.

EXTERIOR: The PINK ICE CREAM & CANDY SHOP project features 3 stories of space constructed on a 16x32 peg base plate. The front exterior is decorated on the sidewalk level with a turquoise picnic table, pink umbrella and striped white and magenta “awning” over the ice cream storefront windows and entrance. A flowering tree is planted near the curb. There is even an ice cream cone “sign”. The second floor exterior has a picture window with awning and flower box and the third floor exterior has two arched windows with pearl gold lattice panels. The entire front façade is a bold scheme of bright and dark pink, along with magenta and white, (please note that Lego® pink colors have multiple subtle shade variations within each color, this is how the bricks arrive from the factory). The back of the building is primarily white with pink accents as are the sides. The back features windows on each floor, a ground level back door and trash dumpster with shovel and broom. Modular construction techniques allow the roof and top floors to be removed for interior viewing and then easily re-stacked.

INTERIOR: The Ice Cream and Candy Shop occupies the interior of the ground floor. The store has two candy counters, a cash register, ice cream scoops and goblets, multiple drink bottles and dispensers and two seats under the stairs. The entire floor is tiled in transparent red and white. Note details like the wall clock and cool interior pink stripe running up and around the walls. The second floor is decorated as an office and has a wall unit, desk, chair and filing cabinet. Notice the artwork on the wall above the desk. Other details include a lamp, bottles and the floor is dark green. The top floor is the studio apartment for the shop owner(s). There is a pink kitchen with sink and stove. A croissant waits on the table next to a chair and the sleeping area has a dresser and bed.

DETAILS: Project contains approximately 1,200 bricks and parts and includes three minifigures as shown, (2 females, one male). The front sidewalk is constructed of white smooth tiles and does not match other building sidewalks of larger-scale architectural projects from the manufacturer. There are no technic bricks with holes on the sides for joining to other structures. Finished model weighs approximately 3 pounds. Model measures 5 inches wide and 10 inches deep at the base plate. Building stands 11 1/8 inches tall at the highest point of the front crown molding.

Below: Front view of the PINK ICE CREAM & CANDY SHOP.


Above: Back side of structure. Note green trash dumpster.

Below: The roof can be easily lifted off to view the interior of the top floor.


Above: The interior of the top floor "studio apartment". Note the pink kitchen, dining table and chair, as well as the dresser and bed.

Below: The second floor is the office with a wall unit, desk and chair. Note artwork on wall over desk.


Above: Interior of Ice Cream & Candy Shop on the ground floor of the 3 level structure.

Below: Another vantage point to view the shop interior.


Above: The four components which make up the finished building. The roof and the top two levels can be removed for interior viewing and easily re-stacked.

Below: Another view of the front and side of the PINK ICE CREAM & CANDY SHOP.


Above: The PINK ICE CREAM & CANDY SHOP shown situated between other buildings from the manufacturer.

Below: The three minifigure pals included if you win the auction for the PINK ICE CREAM & CANDY SHOP.

Tuesday, June 8, 2010

BRICKMASTER® "LANDMARKS" CONTEST WINNER • SAN FRANCISCO FERRY BUILDING BRICK MODEL


Above: A model of the SAN FRANCISCO FERRY BUILDING built by Brick Trick Artist Philip Buchan, as an entry for the "LANDMARKS" building contest sponsored by The LEGO® Group in BRICKMASTER® magazine. This model was one of five winners! Congratulations to all the winners and our own Philip! Great work! All five winning projects appeared in the March/April 2010 issue of BRICKMASTER® magazine. Subcribe to BRICKMASTER® magazine, CLICK HERE.

REMINDER: Click on the image to view an enlargement.

Saturday, May 29, 2010

ORANGE TREE & GARDEN BENCH BUILDING KIT • INSTRUCTIONS


Above: The ORANGE TREE & GARDEN BENCH custom building kit shown assembled with blonde female minifigure "Monique".

ORANGE TREE & GARDEN BENCH BUILDING KIT • INSTRUCTIONS

This posting contains images and directions identical to the printed instructions which are included with each BRICK TRICK DUDE custom building kit, sold exclusively on Ebay.

Below: Parts included in the BRICK TRICK DUDE custom kit.

PARTS LIST
2 white minifigure chairs
2 dark pink 1x4 arch bricks
7 brown 1x1bricks
5 green 2x2 plates
1 brown 2x2 plate
1 white 4x6 plate
12 green leaf parts
2 stalks w/3 stems each
2 sprues of 4 red flowers
18 orange 1x1 caps

GAL PAL Minifigure “Monique” is assembled and includes:
1 tan “ponytail” wig
1 smiley head w/eyebrows,
red lipstick/alternate face
1 white torso w/blue overalls
1 blue hips/legs


Step 1: Place both white chairs on dark pink arch bricks to form “bench”. Stack 6 brown 1x1 bricks in an irregular manner. Place flowers on stems and stack. Place green and brown 2x2 plates on white 4x6 plate.


Step 2: Assemble leaf parts as shown to create 3 sets of 3 leaf part branches. Create the tree top branch canopy by stacking and rotating remaining 3 leaf parts. Place orange caps on branches to serve as fruit.


Step 3: Snap the bench in place as shown and add the tree trunk to the corner peg on the brown 2x2 plate. Add red flower bouquet and place 1 orange cap on green plate as fallen fruit.


Step 4: Place the branches on the tree trunk, rotating each branch, as they are stacked. Place remaining brown 1x1 brick on top of branch stack and add tree top branch canopy.


Step 5: Add the remaining orange 1x1 caps to branches anywhere you like. An orange 1x1 cap can also be placed in the minifigure’s hand. Enjoy the shade and the harvest!


Above: Another shot of the completed ORANGE TREE & GARDEN BENCH custom building kit.

Wednesday, May 26, 2010

A Look Down Brick Trick Boulevard


Above: A view down BRICK TRICK BOULEVARD, where you'll find many larger sized buildings.

A LOOK DOWN BRICK TRICK BOULEVARD

We've been busy this spring building more structures to accompany our collection of large buildings. This posting features images of a street scape set-up where we placed several buildings together for a photo shoot. Additional images show some of the exteriors of our original creations.

REMINDER: Enlarge the images by clicking on them.

Below: A "corner" of this version of the street scape shows the red cocktail bar project and the gray bank building. Also visible are creations from the manufacturer including, at left, the Cafe Corner and at the right in image is the Green Grocer.


Above: The red bar building is designed to be used to create a "corner".

Below: This image shows the bar signage, designed to resemble a martini glass.


Below: This Normandy style building is a law office with an apartment on the floors above.


Above: The blue building is the library. The "LOVE" billboard was created for Valentine's Day.

Below: The gray and black structure is the city bank.

Friday, April 30, 2010

Cafe Corner, Green Grocer, Fire Brigade and Grand Emporium


Above: Four buildings from the series include, (from left), the CAFE CORNER, the GREEN GROCER, the FIRE BRIGADE and the most recent release, the GRAND EMPORIUM.

Large Architectural Building Kits from Lego®

This posting features images of the large building kits from the manufacturer designed primarily for experienced and/or adult builders.

Below: The CAFE CORNER model which has been discontinued. This building has three very detailed exterior floors but came with absolutely nothing inside.


Above: The GRAND EMPORIUM is the most recent addition to this product line and has three floors of retail space which are nicely detailed and decorated throughout.


Above: The FIRE BRIGADE has two floors and includes a vintage fire truck. The interiors of both floors are highly detailed with cool furnishings including a ping-pong table upstairs.


Above: The GREEN GROCER has a pleasing sand green color scheme and a very detailed store on the first level. The two levels of living space above have a few details but are not completely furnished. The third floor has a lot of space taken up with stairs to a roof deck, (not visible in this image).


Above: The four buildings as a street-scape, shot from slightly overhead to display the roof-tops. We added the tree and palms visible in the back of the structures and we changed the small coffee mug on the CAFE CORNER signage to a red Scala® coffee pot.


Above: The group of four buildings shot from straight-on.

Wednesday, April 14, 2010

Lime Pizza Parlor Building


Above: A bold lime green building with pink, purple and teal trim.

Lime Pizza Parlor Building

This project was designed and built by Brick Trick artist Trick Richey. The Lime Pizza Parlor building has a restaurant on the first floor and mezzanine, and a third floor which remains unfinished though could serve as an upstairs apartment. The roof and floors lift off to reveal the interiors.

REMINDER: Enlarge images by clicking on them. Use your browser "back" button to return to this page.

Below: Another vantage point shows the project, designed to be a "corner" on our brick town block.


Above: The Lime Pizza Parlor incorporates many hard-to-find colors such as dark purple, light purple, dark pink, dark turquoise and of course lime.

Below: The backsides of the project.


Above: The roof lifts off for easy access to the third floor space.

Below: The third floor which at this time is still empty.


Above: The entire third floor lifts off the building.

Below: The three sections of the Lime Pizza Parlor.


Above: Looking down through the second floor/mezzanine to the first floor where the restaurant is serving pizza to customers at the counter.

Below: The view inside through one of the large street-level windows.


Above: The front entrance to the Lime Pizza Parlor.

Below: A close-up of the second floor windows.


Above: Another shot of the finished Lime Pizza Parlor building.