Above: The ORANGE GREENHOUSE kit shown assembled with male minifigure "ADAM".
ORANGE GREENHOUSE • BUILDING INSTRUCTIONS
This posting features directions to build the ORANGE GREENHOUSE kit sold by BRICK TRICK DUDE on Ebay.
REMINDER: Enlarge images simply by clicking on them.
Below: Parts contained in the custom building kit.

PARTS LIST
42 clear 1x2 bricks
12 clear 2x2 45-degree slopes
12 orange 1x2 45-degree slopes
8 orange 1x2 grills
18 orange 1x1 bricks
18 lime 1x1 caps
4 red 2x2 smooth tiles
1 green 8x16 base plate
12 green flower stalks (3 stems)
5 sprues of 4 dark pink flowers
4 sprues of 4 red flowers
4 green transparent cones
2 green bamboo leaf parts
2 yellow sunflowers
2 yellow transparent 1x1 caps
3 medium blue transparent 1x1 caps
1 black/gray gearshift
1 orange 2x4 plate
2 orange 1x2 bricks

Step 1: Attach red 2x2 smooth tiles to green 8x16 base plate to create “stepping stones”. Build 4 stacks of 3 clear 2x2 slopes for the roof. Using orange 1x1 bricks and lime 1x1 caps create 6 stacks of 3 alternating caps/bricks. Using 2 stacks of orange bricks/lime caps, add orange 1x4 arch brick and 2 orange grills as shown. Attach green transparent cones together creating 2 stacks of 2. Add green bamboo leaf, yellow sunflower and finish with yellow transparent 1x1 cap on each. Remove flowers from sprues by gently twisting. Place a flower on the end of each stem on all 12 green flower stalks. Stack stems/stalks in 6 bouquets of 2 as shown. Place orange 2x4 plate on orange 1x2 bricks to form garden table. Stack 3 medium blue transparent 1x1 caps and add gearshift to build water atomizer.

Step 2: Assemble clear 1x2 transparent bricks in 9 stacks of 4 bricks each. These stacks will form the greenhouse “walls”. With remaining 6 clear 1x2 bricks, create 2 assemblies of 3 bricks each stacked as shown. These assemblies form the greenhouse “gables”.

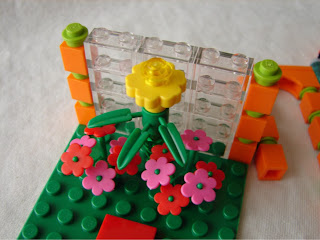
Step 3: Snap 3 wall sections in place as shown. Place sunflower on base plate between pegs.

Step 4: Add orange/lime columns to back wall and flower bouquets to base plate.

Step 5: Add remaining columns and wall sections. Add gable section to back wall.

Step 6: Place orange 1x2 45-degree slopes on back wall as shown to begin roof structure.

Step 7: Carefully add clear slope assemblies and snap remaining gable to front wall.

Step 8: Continue roof structure by adding remaining orange 1x2 slopes to front wall.

Step 2: Assemble clear 1x2 transparent bricks in 9 stacks of 4 bricks each. These stacks will form the greenhouse “walls”. With remaining 6 clear 1x2 bricks, create 2 assemblies of 3 bricks each stacked as shown. These assemblies form the greenhouse “gables”.

Step 3: Snap 3 wall sections in place as shown. Place sunflower on base plate between pegs.

Step 4: Add orange/lime columns to back wall and flower bouquets to base plate.

Step 5: Add remaining columns and wall sections. Add gable section to back wall.

Step 6: Place orange 1x2 45-degree slopes on back wall as shown to begin roof structure.

Step 7: Carefully add clear slope assemblies and snap remaining gable to front wall.

Step 8: Continue roof structure by adding remaining orange 1x2 slopes to front wall.


No comments:
Post a Comment