WELCOME TO THE BRICK TRICK ONLINE STUDIO

Here you can view our designs, projects and building instructions.

Tuesday, October 28, 2008

COTTAGE BLOCK


Image above shows a "block" of cottages. Were creating building for our HOLIDAY TOWN DISPLAY which you may have read about in other BRICK TRICK BLOG posts.

COTTAGE BLOCK

This posting features images of eight cottages we've designed and built here in our FOG CITY brick studio the past two weeks. We plan to do more, using as many different colors as we can. As you can see, right now we have a red and black cottage, one in cream and hot pink, a small commercial unit in pink and maroon, a cool turret-roofed yellow two-story cottage with a garage, a green design with steep-pitched roof line, a powder blue mid-century inspired row house, a classic white building with black trim and the cottage that started it all, the SUNNY YELLOW COTTAGE at the end of the block.


Image above shows the powder blue cottage which has a basement and diamond-shaped windows created using inverse roof slopes. The roof is covered with more than 200 aqua blue transparent caps. (Designed and built by Philip Buchan).

Below the green cottage, complete with a balcony and a roof-top sun deck has dozens of green transparent cones creating "railings". (Designed and built by Philip Buchan).


Above: This bright yellow cottage has a garage on the first level and a turret-roofed porch at the top of the entrance stairs. (Designed and built by Philip Buchan).
Above: Using a small collection of cream colored bricks and arches, this modern unit also boasts a hot pink bay window and has red transparent grills covering the roof as "tiles". Next door, (to the right in photo), is a pink building, with maroon "awnings" and green trim. We think this unit looks like it might house a nail salon on the first floor commercial space. A tiny studio apartment is at the top of the pink stairs. (Built by Trick Richey).

Above: Another view of the BRICK TRICK HOLIDAY TOWN COTTAGE BLOCK.


More postings featuring each cottage, additional images and details will follow in the coming weeks.

Monday, October 27, 2008

RED GO CART BUILDING INSTRUCTIONS


Image above shows the finished GO CART brick model.

Below is a shot of the parts in the RED GO CART custom building kit.

PARTS LIST
2 red 1x3 33-degree slopes
1 red 2x2 seat/chair
1 red 1x2x4 angle plate
1 dark gray 1x2 grill
2 yellow amber caps1 red 2x8 plate
1 black & white steering wheel
3 white 1x2 smooth tiles
2 gray 2x2 plates with axel pegs4 black tires on 4 gray rims


Step 1
Attach the tires and rims to the gray 2x2 axel plates. Place 1 white 1x2 smooth tile on the top pegs of the red 1x2x4 angle plate. Attach the 2 yellow amber caps and dark gray grill.


Step 2
Place the 2 red 1x3 slopes on the red 2x8 plate as shown. Add the steering wheel and a white smooth tile at the end of the red 2x8 plate.


Step 3
Place the red 2x2 seat on the remaining 4 pegs of the red 2x8 plate, between the steering wheel and the white tile. Add the remaining white tile to the pegs on the slopes.


Step 4
Place the red 1x2x4 angle plate assembly on the remaining two pegs of thered 2x8 plate at the front of the GO CART.


Step 5
Add the 2 gray 2x2 axel plates with rims/tires to the underside of the red 2x8 plateat the front edge and the back edge. You’re ready to roll!

AIRPLANE #2 BUILDING INSTRUCTIONS

This area will be available shortly.

AIRPLANE #1 BUILDING INSTRUCTIONS


Above: Finished Model.

Below is a shot of the parts included in the kit to build AIRPLANE NUMBER ONE.

PARTS LIST
1 red 2x8 plate
2 red 2x3 plates
1 blue 2x8 plate
1 red minifigure seat/chair
1 black/white steering wheel
1 white tail fin
1 white 2x2 brick w/stud
2 black tires on 2 gray rims
1 gray 2x2 plate with axels
3 clear 1x2 plates
1 clear 2x2 45-degree slope
1 black propeller
6 red transparent 1x2 grills
8 white 1x2 smooth tiles


Step 1: Attach the 2 red 2x3 plates to the red 2x8 plate. Put the wheels/rim on the axel plate and attach the propeller to the stud on the white 2x2 brick. Stack the 3 clear 1x2 plates.


Step 2: Place the stud and propeller on the front of the red 2x8 plate. Add the stack of 3 clear 1x2 plates. Add the tail fin and place the clear slope on the blue plate as shown.


Step 3: Attach the blue 2x8 plate on top of the stack of clear plate and over 1 set of pegs on the white stud brick with prop.Add the red minifig seat/chair.


Step 4: Place white 1x2 smooth tiles as shown, on top of the clear 2x2 slope, above the prop, on the blue wings and on the red tail plates.


Step 5: Finish by adding the red transparent grills. The wheel assembly goes under the bottom red plate parallel to the wings. Tiles & grills can be rearranged to create alternate patterns.


Above: Another view of AIRPLANE NUMBER ONE.

RED MAKE-UP VANITY BUILDING INSTRUCTIONS


Above: Finished RED VANITY model.

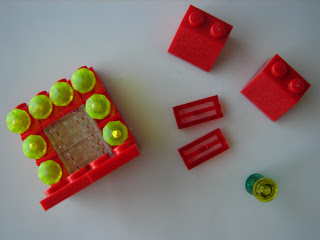
Below: Parts included in the RED VANITY custom building kit.

PARTS LIST
2 red 2x3 plates
2 red 2x2 45-degree slopes
8 red 1x1 angle bricks
2 red transparent 1x2 grills
1 yellow amber cap
1 transparent green cone
8 neon jewels
6 clear 1x2 plates


Step 1: Place the narrow stem end of the jewels in to theside-facing hole on each of the 8 red 1x1 angle bricks. Add the amber cap to the top of the green cone. Stack clear plates.


Step 2: Stack 3 of the red angle bricks as shown, repeat with 3 more. Add the remaining 2 red 1x1 angle bricks to the stack of clear 1x2 plates.


Step 3: Place the stacks of red angle bricks with jewels and the stack of clear plates on the 2 red 2x3 plates as shown to form the vanity mirror, light bar and counter top.


Step 4: Place the 2 red 2x245-degree slopes on the underside of the 2 red 2x3 plates toward the backof the VANITY.


Step 5: Add the 2 red transparent grills to the pegs on top of the red angle bricks. Place the “perfume bottle” made from the cap and coneon the counter.

The RED VANITY is a cool addition to your minifig bedroom, powder room or even your brick beauty salon.

RED HOLIDAY PUSH CART BUILDING INSTRUCTIONS


Above: Finished RED HOLIDAY TREE PUSH CART with female minifigure wearing green overalls.

Below: Parts included in the RED HOLIDAY TREE PUSH CART custom building kit.

PARTS LIST
1 red 2x3 plate
1 black 2x2 plate
2 black tires on 2 gray rims
1 gray 2x2 plate with axel pegs
2 dark gray 1x2 grills
1 black 1x2 handle part
1 small green tree
Please note that minifigure parts may vary and include:
1 hat or wig
1 minifig head (various faces)
1 torso (green or blue overalls)
1 hips/legs (green or blue)
Minifigures are assembled.


Step 1: Attach the black 2x2 plate to the bottom of the tree. Put the rims/tires on the gray 2x2 axel plate.


Step 2: Place the two red 1x1 angle bricks, with side pegs facing outward, on the red 2x3 plate.


Step 3: Attach the black handle part to the two side pegs on the red 1x1 angle bricks. Add the 2 dark gray 1x2 grills as shown, one on top of the 2 red angle bricks, the next on the red plate.


Step 4: Place the wheel/axel assembly on the bottom of the red 2x3 plate, on the opposite end from the handle.


Step 5: Finish by placing the tree and black 2x2 plate on the remaining 2 pegs of the red 2x3 plate and your ready to add your minifigure or use as is!

Below: Finished RED HOLIDAY TREE PUSH CART with male minifigure wearing blue overalls.

GREEN RECYCLING DUMPSTER BUILDING INSTRUCTIONS


Above: Finished RECYLCING DUMPSTER complete with minifigure.

Below: Parts included in the RECYLCING DUMPSTER custom building kit.

PARTS LIST
1 lime 4x4 plate
5 lime 1x2 bricks
1 green 1x4 brick
2 green 1x2 45-degree slopes
2 white 1x2 smooth tiles
4 dark gray 1x2 grills
3 transparent green cones
Minifigure parts for RECYCLE MAN include:
1 red construction hard hat
1 head (beard/grimace face)
1 orange worker uniform torso
1 orange hips/legs
Minifigures are assembled.


Step 1: Attach the 5 lime 1x2 bricks as shown to form the bottom row of the dumpster using the lime 4x4 plate as the base. Add the 2 white 1x2 smooth tiles to the base.


Step 2: Place the green 1x4 brick at the back of the assembly on top of the rowof lime bricks and add the2 green 1x2 slopes to the sides as shown.


Step 3: Add the dark gray1x2 grills as shown to cap off the remaining pegs on the lime and dark green bricks/slopes.


Step 4: Place the transparent green cones inside the recycling dumpster to simulate bottles.


Step 5: Place the broom in the hand of the RECYCLING MAN so things can stay nice and tidy on your brick townor city streets. You’re done!

Below: Close-up of the GREEN RECYCLING DUMPSTER.

LIME FOUNTAIN BUILDING INSTRUCTIONS


Above: Finished model.

Below: Parts included in the LIME FOUNTAIN custom building kit.

PARTS LIST
1 lime 4x4 plate
6 lime 1x2 bricks
6 white 1x2 smooth tiles
35 aqua blue caps


Step 1: Attach the six lime 1x2 bricks as shown to form a square “box”.


Step 2: Place the 6 smooth 1x2 white tiles on the top of the lime 1x2 bricks. Overlap the tiles with brick pegs to increase structural integrity.


Step 3: Stack the aqua blue caps. You’ll need a stack of 7, 8, 9 and 11. This will use all 35 caps, which are included.


Step 4: Place the stacks of aqua blue caps on the lime 4x4 plate on the 4 remaining pegs inside your brick “box”. You’re done!


Alternatives: Stack the aqua blue caps at different heights,and/or add more aqua blue caps of your own for a towering brick fountain display!