Above: Finished model with female minifigure.
PINK CONVERTIBLE • BUILDING DIRECTIONS
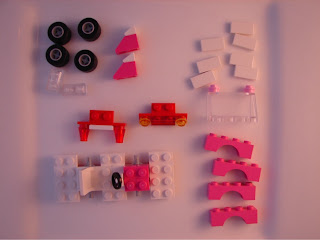
Below: Parts included in the BRICK TRICK DUDE kit available on Ebay.

PARTS LIST
1 red 2x8 plate
3 white 2x4 plates2 gray 2x2 axel plates
4 gray rims
4 black rubber tires
4 dark pink 1x4 arch bricks
2 dark pink 1x2 slopes
2 white 1x1 slopes
2 red 1x4x2 angle plates
2 amber transparent caps
1 red transparent 1x2 grill
2 red transparent 1x1 cones
9 white 1x2 smooth tiles
1 clear 2x4x2 wind shield
1 black/white steering wheel
1 white minifigure seat
2 bright pink 1x1 caps
4 dark pink 1x1 bricks
4 clear transparent 1x2 plates

Step 1: Begin by placing black rubber tires on gray rims. Add white 1x1 slopes to dark pink 1x2 45-degree slopes.Snap bright pink 1x1 caps to pegs on top of the windshield. Assemble clear transparent 1x2 plates into two stacksof two plates each.

Step 2: Begin chassis assembly by placing white 2x4 plates and gray 2x2 axel plates on the red 2x8 plate as shown.

Step 3: Add 1 white 1x2 smooth tile, minifig seat, steering wheel and 1x1 dark pink bricks as shown.

Step 4: Use 1x4x2 red angle parts and add red transparent cones and 1 white smooth tile to one, while adding amber caps and red grill to the other.

Step 5: Place headlight and taillight assemblies on chassis.

Step 6: Attach dark pink 1x4 arch bricks to form fenders.

Step 7: Add windshield. Place the dark pink/white slope assemblies to form tail “fins”.

Step 8: Add remaining white 1x2 smooth tiles to finish “hood” and car “body”.

Step 9: Carefully add the wheel assemblies and you’re ready to roll!

Notes: Change the color of your car by simply replacing the dark pink arch bricks and slopes with bricks of another color.


No comments:
Post a Comment