Tuesday, December 22, 2009
Street of Larger Buildings
Above: Pictured are several architectural creations from the BRICK TRICK studio. These structures, which include a cinema, hotel, hair salon and pizza parlor among others, were designed and built to accompany the GREEN GROCER kit from the manufacturer. Future postings will feature images of each building, as many of the projects have fully furnished interiors and the floors and rooftops lift off for easy viewing and play!
Happy Holidays!
Labels:
brick artist,
brick model,
brick sculpture,
brick trick,
cinema,
hair salon,
holiday town,
hotel,
pizza parlor
Sunday, December 13, 2009
PINK & MAGENTA CONVERTIBLE CAR KIT with GAL PAL HANNAH
Above: The PINK & MAGENTA CAR KIT shown assembled with a new female minifigure we named HANNAH. After receiving numerous requests for car kits with "blonde" figures, we're offering this popular pink vehicle building kit with GAL PAL HANNAH wearing a white floral print blouse and blue pants. This kit is available until sold out from BRICK TRICK DUDE on Ebay, CLICK HERE.
RED SNOWMOBILE with GUY PAL CHARLES
Above: After receiving numerous requests, we created a male minifigure version of this popular holiday building kit. The RED SNOWMOBILE & CHRISTMAS TREE kit is now available with guy pal CHARLES. Review the directions to build this kit, CLICK HERE.
Check out all the BRICK TRICK DUDE custom building kits available on Ebay, CLICK HERE.
Monday, November 23, 2009
ELECTRIC PIANO & PINK FLOWERS • BUILDING INSTRUCTIONS
Above: The ELECTRIC PIANO & PINK FLOWERS KIT shown assmbled with a female minifigure we named Alicia.
ELECTRIC PIANO & PINK FLOWERS • BUILDING INSTRUCTIONS
This posting features images and instructions to build this BRICK TRICK DUDE custom kit sold exclusively on Ebay.
Below: Parts included in the BRICK TRICK DUDE custom kit.
PARTS LIST
2 sprues of 4 dark pink flowers
2 green stalks w/3 stems each
1 neon green trans. 1x1 cone
1 black 1x2 grill
1 black 1x2 tile w/single peg
4 black 1x1 plates w/grabber
2 black 1x4 plates
1 black 2x2 plate
1 black 2x4 plate
2 black 1x2 bricks
4 white 1x2 smooth tiles
10 red trans. 1x2 caps
2 black 1x3 curved bows
Minifigure Musician “Alicia” is assembled and includes:
1 dark tan “bob cut” wig
1 female head with red lipstick and alternate face on back of head
1 solid red torso
1 white hips/legs
Step 1: Remove flowers from sprues and place on stems. Create 2 stacks of 4 red trans. 1x1 caps. Connect black 2x2 and 2x4 plates using 1 black 1x4 plate and add 2 remaining red transparent caps as shown.
Step 2: Place the remaining black 1x4 plate centered at the front of the keyboard assembly and attach using the 4 white 1x2 smooth tiles, which indicate the “ivory keys”.
Step 3: Attach the 4 black 1x1 plates with grabbers to the top pegs of the upper black 1x4 plate. “Grabbers” will overlap the white 1x2 smooth tiles to serve as the “ebony keys”.
Labels:
alicia,
custom building kits,
ebay auction,
electric piano,
female minifigure,
keyboard,
musician,
piano,
red
Wednesday, November 18, 2009
BLUE CITY BUS PROJECT
Above: The finished BLUE CITY BUS project designed and built by BRICK TRICK Artist Philip Buchan.
BLUE CITY BUS PROJECT
This posting features images and details which showcase a custom building project for the BRICK TRICK town, the BLUE CITY BUS. Of course the project has operable doors and minifigures can occupy the seats in the interior. How do you get inside? Lift off the roof!
Reminder: Enlarge the images by clicking on them.
Below: The BLUE CITY BUS project shown completed, DARK PURPLE was used as the trim color.
Labels:
blue,
blue city bus,
brick artist,
brick model,
dark purple,
holiday town,
philip buchan
Saturday, November 14, 2009
CHRISTMAS SHOPPER & TREE CART • BUILDING INSTRUCTIONS
Above: The BRICK TRICK DUDE custom building kit for the CHRISTMAS SHOPPER & TREE CART shown assembled with a female minifigure we named Chrissy.
CHRISTMAS SHOPPER & TREE CART • BUILDING INSTRUCTIONS
This posting contains images and directions identical to the printed instructions included with this custom building kit sold exclusively by BRICK TRICK DUDE on Ebay.
REMINDER: Enlarge the images by clicking on them.
Below: Parts contained in the custom building kit.
PARTS LIST
1 white 2x2 plate
2 white 1x2 grills
1 red transparent 1x1 cone
2 red transparent 1x1 smooth tiles
1 green transparent 1x1 smooth tile
1 white 2x4 plate
1 white 2x2 45-degree inverse slope
2 white 1x2 plates w/handle
1 dark pink 1x1 brick
2 light gray 2x2 axle plates
1 red sprue of 4 flowers
1 white sprue of 4 flowers
2 green stalks w/3 stems
4 white rims
4 black rubber smooth tires
1 green 2x2 small pine tree
Custom Minifigure “Chrissy” is assembled and includes:
1 black “bob cut” wig
1 female head with red lipstick and alternate face on back
1 red torso
1 green hips/legs
Step 1: Place tires on rims. Remove flowers from sprues and place on stems. Add 1 red and 1 green 1x1 smooth tile to 1 white 1x2 plate with handle to create the “shopping bag”.
Step 2: Place the white 2x2 45-degree inverse slope on the white 2x4 plate as shown. Add the white 1x2 grills and the white 1x2 plate with handle to create the shopping cart chassis.
Step 3: Attach the wheels to axle plates. Place white 2x2 plate on bottom of tree. Add red transparent 1x1 smooth tile to dark pink 1x1 brick to create the “gift box”. Stack flower stems and add to red 1x1 cone to create the floral arrangement.
Tuesday, November 10, 2009
RED SNOWMOBILE & CHRISTMAS TREE • BUILDING INSTRUCTIONS
Above: The RED SNOWMOBILE & CHRISTMAS TREE with female minifigure, (we named her Chelsea), shown assembled.
RED SNOWMOBILE & CHRISTMAS TREE • BUILDING INSTRUCTIONS
This posting contains images and instructions identical to the printed instructions included with this custom building kit sold exclusively by BRICK TRICK DUDE on Ebay.
Below: Parts included in the BRICK TRICK DUDE custom kit.
PARTS LIST
1 red 2x2 plate
1 white 1x2 tile w/panel
1 black/white steering wheel
2 black 1x2 plates w/handle bars
1 red 1x2 plate
2 red 1x3 curved bows
1 white 2x8 plate
1 green 2x2 small pine tree
Minifigure “Chelsea” is assembled and includes:
1 black “page cut” wig
1 female head with red lipstick and alternate face on back
1 medium blue torso with printed overalls pattern
1 blue hips/legs
Step 1: Place both 1x3 red curved bows on the red 1x2 plate. Add black 1x2 plates with handle bars to the underside of the white 2x8 plate as shown.
Step 2: Place the red curved bows and plate assembly on the white 2x8 plate. Snap the green 2x2 small pine tree to the red 2x2 plate.
Step 3: Attach the black/white steering wheel to the white 2x8 plate. Next add the white 1x2 tile with panel to the white 2x8 plate to create seat “backrest”.
Tuesday, November 3, 2009
POLICE AIRPLANE • BUILDING INSTRUCTIONS
Above: The BLACK & WHITE POLICE AIRPLANE custom kit shown assembled with a custom male minifigure we named "Sergeant Jones".
POLICE AIRPLANE • BUILDING INSTRUCTIONS
This posting contains directions and images identical to the printed instructions included with the purchase of this custom building kit sold exclusively on Ebay by Brick Trick Dude.
Below: Parts included in the BRICK TRICK DUDE custom kit.
PARTS LIST
1 white 1x2 brick w/stud
1 black propeller
4 white 1x2 grills
1 clear transparent 2x2 45-degree slope
6 black 1x2 tiles w/single peg
4 black 1x2 bricks
2 white 1x2 plates w/handle
1 white 1x2 tile w/panel
1 black/white steering wheel
1 white 1x2 tile w/tailfin
2 dark blue transparent 1x1 caps
4 red transparent 1x1 caps
2 white 2x8 plates
1 white 2x4 plate
2 light gray rims
1 light gray 2x2 axle plate
2 black wide rubber tires
Minifigure “Sergeant Jones” is assembled and includes:
1 white helmet with “POLICE” imprint
1 medium blue transparent visor
1 male head w/scruff beard
1 black police suit torso
1 black hips/legs
Step 1: Attach propeller to white 1x2 brick with stud. Place 1 white 1x2 grill on clear 2x2 slope. Add tires to rims, place on axle plate pegs. Place black 1x2 bricks on 1 white 2x8 plate as shown.
Step 2: Add the steering wheel and both white 1x2 plates with handles to the white 2x8 airplane assembly. Place dark blue and red transparent caps on black 1x2 tiles with single pegs.
Step 3: Attach 1 white 1x2 grill to propeller assembly. Place clear 2x2 slope centered on remaining white 2x8 plate and add grills/tiles as shown. Add white panel, tailfin and white 1x2 grills to white 2x4 plate.
Friday, October 30, 2009
PURPLE & TEAL PICNIC TABLE • BUILDING INSTRUCTIONS
Above: The PURPLE & TEAL PICNIC TABLE kit shown assembled with a custom female minifigure we named Kimberly.
PURPLE & TEAL PICNIC TABLE • BUILDING INSTRUCTIONS
This posting features images and instructions to build the PURPLE & TEAL PICNIC TABLE sold on Ebay exclusively by BRICK TRICK DUDE.
REMINDER: Enlarge the images by clicking on them.
Below: Parts included in the BRICK TRICK DUDE custom building kit.
PARTS LIST
1 dark purple 4x4 parabola
1 orange 1x1 cap
1 orange 2x2 plate
1 white antennae pole
1 clear trans. goblet
1 yellow minifigure mug
1 red trans. 1x1 cap
1 green trans. 1x1 cone
1 dark blue trans. 1x1 cap
1 orange trans. 1x1 cone
2 dark turquoise 1x2 bricks
2 dark turquoise 2x3 33-degree inverse slopes
3 dark purple 2x4 plates
GAL PAL Minifigure “Kimberly” is assembled.
1 dark tan “bob cut” wig
1 female head w/eyebrows, red lipstick/alternate face
1 medium blue torso with printed blue overalls
1 blue hips/legs
Step 1: Place orange 1x1 cap on top peg of dark purple 4x4 parabola. Snap transparent caps on to transparent cones to create “soda bottles”. Place both dark turquoise 2x3 33-degree slopes on orange 2x2 plate as shown.
Step 2: Place dark purple parabola with orange cap on white antennae to complete the “umbrella”. Snap both dark turquoise 1x2 bricks on to the top of the table base assembly as shown.
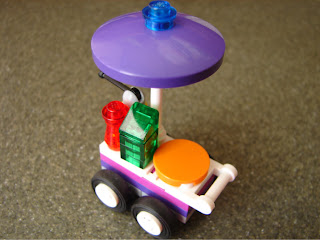
PURPLE PIZZA VENDOR CART • BUILDING INSTRUCTIONS
Above: The PURPLE PIZZA VENDOR CART shown assembled with a custom female minifigure we named Sophia.
PURPLE PIZZA VENDOR CART • BUILDING INSTRUCTIONS
This posting features images and instructions to build the PURPLE PIZZA VENDOR CART sold exclusively on Ebay by BRICK TRICK DUDE.
Below: Parts included in the BRICK TRICK DUDE custom kit.
PARTS LIST
1 dark purple 4x4 parabola
1 dark blue transparent 1x1 cap
1 red transparent 1x1 cap
1 red transparent 1x1 cone
1 green transparent 1x1x2/3 slope
3 green transparent 1x1 plates
1 black/gray gear shift
1 white antennae pole
1 dark purple 2x4 plate
1 light purple 2x4 plate
1 white 1x2 grill
1 orange 2x2 round tile
1 white 2x2 plate
1 white 1x2 plate w/handle
1 yellow 1x1 cylinder
4 white rims
4 black smooth rubber tires
2 light gray 2x2 axle plates
Custom GAL PAL Minifigure “Sophia” is assembled an includes:
1 dark tan “bob cut” wig
1 female head w/eyebrows, red lipstick/alternate face
1 red torso
1 white hips/legs
Step 1: Place tires on rims. Snap blue cap on to top peg of dark purple parabola. Add red cap to red transparent cone. Stack green transparent 1x1 plates, top with green transparent slope. Add gear shift to yellow 1x1 cylinder. Stack purple 2x4 plates.
Step 2: Place dark purple parabola “umbrella” on white antennae. Snap white 2x2 plate, white 1x2 grill and white 1x2 plate with handle to the top of purple 2x4 plate stack. Add rims/tires to stud pegs on light gray 2x2 axle plates.
Subscribe to:
Posts (Atom)